Monday, December 27, 2010

Fashionably Late Buche de Noel

Merry Few-Days-After-Christmas, friends! Did you all have wonderful holidays full of eggnog and stockings and too many cookies and repeated viewings of Elf? I know I did.

I also had an awesome gift from Santa:

How great is that?! I guess he reads the blog! Sweeeet. A sassy shirt is all well and good, but next year I'm going to be dropping waaaay more hints about the VitaMix I'm currently coveting. Ahem.

But back to more important things! Like what I used all the ganache for. I'll give you a hint: it's chocolatey. I'll give you a second hint: it was seasonally appropriate, but now, two days after Christmas, it's woefully unfashionable. I'll give you a third hint: it rhymes with smoosh the po-elle.


If you guessed a buche de noel, you're right!


Most buche de noels, or yule log cakes, are made from a springy sponge or genoise cake rolled around a filling, then decorated to look like yule logs. This recipe was a bit different--and dare I say, much better--because it used a flourless chocolate cake that was more like a baked mousse in taste and texture. It was a little more finicky to work with, but the melting, creamy texture more than made up for a few more minute's work.


The cake was rolled around sweetened vanilla whipped cream, and then covered with simple ganache. I used a spatula and a fork to give it a little texture, and stole a few sprigs of rosemary from my parent's bush to decorate the plate, along with some freshly shredded coconut and fresh cranberries.


And the mushrooms. Let's not forget the meringue mushrooms! What should have been a simple accompaniment was made more interesting by the fact that I baked them on the day a big storm rolled into town, causing the meringues to get spongy and sticky. I was able to assemble about a third of them, held together with the most fervent of hope and the sharpest of toothpicks.


The mushrooms were a wreck by the end of the night, but they held together enough for the pictures, which is the important part. Plus, they're fun to make, even when they collapse in a gooey pile.


In the end it was a huge success. We took slices that were way too big, polished them off, and licked our plates clean. And isn't that what Christmas is all about?

Fashionably late--OR AWESOMELY EARLY FOR CHRISTMAS 2011--buche de noel recipe below!


Buche de Noel
Cake recipe from Rose Levy Beranbaum's The Cake Bible

1/4 cup (50 grams) plus 2 tablespoons (28 grams) granulated white sugar
6 large eggs, separated
1/2 teaspoon pure vanilla extract
4 ounces (112 grams) bittersweet or semisweet chocolate, chopped in small pieces
3/4 teaspoon cream of tartar

Preheat oven to 350 degrees F (180 degrees C) and place the oven rack in the center of the oven. Butter, or spray with a non stick vegetable spray, a 17 x 12 inch (43x30 cm) baking pan. Line the pan with parchment paper and then butter and flour the parchment paper.

While the eggs are still cold, separate the eggs, placing the whites in one bowl and the yolks in another. Cover and bring to room temperature before using (about 30 minutes). Meanwhile melt the chocolate in a heatproof bowl placed over a saucepan of simmering water. Remove from heat and cool.

In the bowl of your electric mixer (or with a hand mixer) place the egg yolks and 1/4 cup of sugar and beat until light and fluffy (about five minutes). (When you slowly raise the beaters, the batter will fall back into the bowl in a slow ribbon.) Beat in the vanilla extract. Scrape down sides of bowl. Add the melted chocolate and beat only to combine.

In a clean mixing bowl, with the whisk attachment, beat the egg whites until foamy. Add the cream of tartar and beat at medium-high speed until soft peaks form. Gradually beat in the remaining 2 tablespoons sugar until stiff peaks form.

Gently fold a small amount of the egg whites into the egg yolk mixture using a rubber spatula or whisk. Fold in the remaining whites just until incorporated. Don't over mix or the batter will deflate. Spread the batter evenly into the prepared pan. Bake until the cake is puffed, has lost its shine, and springs back when gently pressed, about 15-17 minutes. Remove from oven and place on wire rack to cool. Cover the cake with a clean, slightly damp towel.

Whipped Cream


1 cup heavy whipping cream
1/4 cup granulated sugar
1 tsp vanilla
1/2 tsp cinnamon

Beat together all ingredients until the cream starts to hold firm peaks, but don't beat so long that it starts to curdle and have a buttery, overwhipped texture.

Ganache

12 oz good-quality semi-sweet chocolate
1.5 cups heavy cream
2 tbsp softened butter

Chop the chocolate into small pieces and place it in a large bowl. Add the butter on top. Put the cream in a saucepan over medium-high heat and heat until it simmers and bubbles appear along the sides of the pan, but do not bring it to a boil.

Pour the hot cream over the chopped chocolate and whisk it together until the chocolate melts and the mixture is shiny and smooth.

Cover with cling wrap and, ideally, let sit overnight at room temperature to firm up until it is a spoonable consistency, like peanut butter. If you don't have that much time, place it in the refrigerator and whisk it every 15 minutes until it is the texture of frosting. Do not leave it in the fridge too long, or it will get hard!

Meringue Mushrooms

Try my recipe here, or there's also a photo tutorial. Easy, yay!

Buche de Noel Assembly
Once the cake has cooled, spread it with an even layer of the whipped cream. Gently roll the cake, peeling off the parchment paper as you roll (the cake may crack).

Trim one end of the cake at an angle and set it aside. Then place the cake, seam side down, on your serving platter lined with strips of waxed paper. Take the slice of reserved cake and attach it to the top of the cake to resemble a branch growing off the log.

Gently spread the ganache over the outside of the cake. Once it's completely covered, use a spatula or a fork to create waves and texture in the ganache to resemble tree bark.

Finish the buche de noel with meringue mushrooms, powdered sugar or coconut for snow, and optional accents like leaves or chocolate shavings.

Read More...

Monday, December 20, 2010

Hot Chocolate On A Stick

I have a love-hate relationship with hot chocolate.

I love that such a product exists. Chocolate! In a cup! Suitable for slurping!
I hate that it most often comes from chalky powdered mixes. Ew.
I love that hot chocolate goes with everything: marshmallows, candy canes, a nutritious veggie-packed dinner...
I hate that it is the caloric equivalent of a small meal, especially when I add those marshmallows and candy canes.

As I've grown older, the sensible part of my brain has sided with the "hates" and hot chocolate has become more and more of a rarity in my diet.

Until.

Hot Chocolate On A Stick.

The name is a bit of a misnomer. It should really be called "Super Intense Fudge Blocks That You Skewer And Oh Yeah, If You Put Them In Milk They Melt And Make Amazing Liquid Fudge."

THAT is truth in advertising.

The basic recipe is just four ingredients: cream, condensed milk, and two kinds of chocolate. They're blended together, and then once the fudge sets up, it's cut into blocks and be-sticked. Really, that's it. It's a plain and simple process that produces the best hot chocolate I've had in a long time. It's ridiculously rich, of course, but not too sweet at all, and it actually tastes like chocolate instead of defatted cocoa and hydrogenated palm kernel oil and whatever else they're shoving into those cocoa mixes these days.

The fudge is fine on its own, but I would absolutely recommend making this primarily as a hot chocolate delivery device. The fudge can be cut into squares or rectangles (or circles! or dodecahedrons!) and can be flavored with all sorts of flavoring oils. I left some plain, rolled some in crushed candy canes, and drizzled and dunked some in orange-flavored white chocolate. [PSA: do not add orange zest to white chocolate, it will seize. Stick to orange oil for flavoring. Cannot believe I did not know this before. Older and wiser, et cetera.]


Through hard experience, we can vouch that the hot chocolate is also an excellent biscotti-softening tool. I made this Christmas biscotti for the Oh Nuts blog and if I may be a huge braggart, it's a winner. It has red & green pistachios, cranberries, white chocolate, and orange zest, and it's simply begging for a hot chocolate bath. Biscotti + hot chocolate on a stick = best gift plate ever? Just sayin....

I still have a love-hate relationship with hot chocolate, however:

I love how it tastes
I hate that it's still one trillion calories
I love that I've had two mugs today
I hate that the second batch is almost gone!


Hot Chocolate On A Stick

yield: about 25 pieces

  • 1/2 cup heavy cream

  • 14-oz can sweetened condensed milk

  • 18 oz (about 3 cups) chopped semi-sweet chocolate or chips

  • 4 oz (about 3/4 cup) chopped unsweetened chocolate

  • lollipop sticks, coffee stirrers, straws, etc


Prepare an 8x8 pan by lining it with aluminum foil and spraying the foil with nonstick cooking spray. Place the chopped semi-sweet and unsweetened chocolates in a large heat-safe bowl.

Pour the heavy cream and condensed milk into a medium saucepan and whisk until combined. Put the saucepan over medium heat. Bring the liquid to a simmer, whisking frequently so that the condensed milk does not scorch on the bottom of the pan.

Once the liquid is simmering, pour the hot cream over the chopped chocolate and let it sit for a minute to soften. Begin whisking the cream and chocolate together, until the chocolate is melted and you have a shiny, smooth mixture. It will be fairly thick.

Pour the chocolate into the prepared pan and smooth it into an even layer. Allow it to sit and firm up overnight, or for 3-4 hours in the refrigerator.

Once the fudge block is firm, use a large, sharp knife to cut it into pieces. If you do squares you get about twenty-five pieces (five rows and five columns), or you could do longer rectangles like I did. For the smoothest cuts, rinse the knife in hot water and dry it between each cut. Skewer each block with a lollipop stick.

To make hot chocolate: heat a mug of milk (water does not work well in this instance) and add a chocolate block. Allow it to sit and soften for a minute, then vigorously stir until it is dissolved. I find it's easiest to use a fork to break up the chocolate, or a mini whisk would also work well.

Store Hot Chocolate On A Stick in an airtight container for up to a week at room temperature, two weeks in the refrigerator, or up to a month in the freezer.

Read More...

Tuesday, December 14, 2010

TWD: Apple-Coconut Family Cake

On paper, this Apple-Coconut Family Cake had a lot going for it.


For one thing, I like apple, and I love coconut. Love. Try to use it as often as possible. Named a whole month after it. Want to call my first child Coconut LaBau. (Actually, I want to call my first child Angela-Merkel LaBau*, like the German Chancellor, but someone in the house thinks it's inappropriate. He'll be sorry when we end up with Baby Coconut.)

For another, I actually had family visiting when I made it! My parents, these distinguished individuals, were in town and begging for dessert:


And finally, it looked pretty sexy going into the oven, with the overlapping apple slices and dusting of sugar:


Well, the positive news is that it retained its good looks upon baking. This is a distinguished cake, much like Chancellor Angela Merkel. Just sayin'.


Unfortunately, the taste and texture of this one just didn't measure up for me.


There's a passage in Steve Almond's book Candyfreak--which should be required reading in high school English classes, it is a true work of art--in which he compares eating coconut to chewing on cuticles. I never really agreed with that analogy, until I tried this cake.

It's like this: I take a bite, the cake is nice. Tender chunks of apple, a strong vanilla scent, all is going well...until most of the cake is chewed and swallowed, and I'm left with stringy bits between the teeth, refusing to break down, resembling nothing so much as stubborn cuticles in the mouth. Gross.

I will say, however, that the rest of the family quite liked it, so obviously I have my own cuticle-and-coconut issues to work out. What did everyone else think?

* My obsession with her has everything to do with the way her name flows off the tongue and nothing to do with her politics. Just to be clear.

Read More...

Thursday, December 09, 2010

Make Your Own Candy Cane Joe-Joes

I don't know what I would do without my local Trader Joe's grocery store. Where else would I go with a shopping list 3 items long and leave an hour later, $70 poorer and with four overflowing shopping bags stuffed to the brim with impulse buys like chocolate-covered soybeans and freeze-dried mangoes? Yes, Trader Joe's is a magical place, and despite the danger to my wallet, I keep going back, because so many of their products are so darn good.

Take the Candy Cane Joe-Joe's, for instance: an Oreo-like cookie with a cream filling studded with candy cane pieces. Chocolatey, minty, crunchy, creamy... Can it get any better?

Well, actually...
I really like Candy Cane Joe-Joe's for what they are: a tasty mass-produced, industrially made cookie. But how could they possibly compare to homemade cookies, made fresh, with quality ingredients?

Um, they can't.

Which is why I'm here to share this recipe for homemade Candy Cane Joe-Joe's with you.

I'm not going to sugar-coat it: this recipe can be a bit time-consuming if you share my nitpicky tendencies and want all of your chocolate wafers to be uniform. That'll require lots of rolling, cutting, re-rolling, chilling, et cetera. So budget some time for that, and then meet me at Obsessives Anonymous at 7pm sharp. I'll bring identically-sized treats.

OR you can throw caution to the wind, and just roll the dough into balls and flatten them with a drinking glass. If you go this route, the recipe is a snap to put together: a quick-mixing dough, a short baking time, and a super-fast buttercream of the powdered sugar-and-butter variety.

And the crushing of candy canes. Can't forget that crucial aspect. Get your heaviest rolling pin and your pent-up angst, it's about to get real.

I also recommend that you be judicious with the use of pink food coloring, otherwise your Joe-Joe's will have an alarming shade of pink on the inside, as mine so helpfully demonstrate above. But that's just one more thing that makes them charmingly homemade. Sorry Trader Joe's...you can do many things, but these cookie have you beat.

These are a MUST for my holiday Christmas plates every year, but I'm still planning out the rest of my holiday baking. What are your must-makes during the holidays?


Homemade Candy Cane Joe-Joe's

Cookie recipe adapted from Bon Appetit, Dec 2005

Cookies
* 1 3/4 cups all purpose flour
* 1/2 cup unsweetened cocoa powder (preferably Dutch-process)
* 1/4 teaspoon salt
* 1 cup sugar
* 3/4 cup (1 1/2 sticks) unsalted butter, room temperature
* 1 large egg

Filling
* 3 cups powdered sugar
* 1 stick unsalted butter, softened to room temperature
* 2 tbsp milk at room temperature
* 1/2 tsp mint extract
* 1/8 tsp salt
* drop of red or pink food coloring

* 4 large candy canes

For cookies:

Whisk flour, cocoa, and salt in medium bowl to blend. Using electric mixer, beat sugar and butter in large bowl until well blended. Beat in egg. Add dry ingredients; beat until blended. If you want to roll it out, refrigerate the dough 1 hour.

Preheat oven to 350°F. Line 2 baking sheets with parchment paper. Roll the dough between two sheets of parchment paper until it is a little less than 1/4" thick. Use a small circular cutter to cut 2" circles of dough out and place them on the baking sheets. If the dough is still chilled, re-roll and cut out more circles, otherwise, chill it briefly until it is firm enough to work with. Continue until all of the dough has been shaped into circles.

Alternately, scoop out dough by level tablespoonfuls, then roll into smooth balls. Place balls on prepared baking sheets, spacing about 2 inches apart. Using bottom of glass or hands, flatten each ball to 2-inch round (edges will crack).

Bake until cookies no longer look wet and small indentation appears when tops of cookies are lightly touched with fingers, about 9-11 minutes (do not overbake or cookies will become too crisp). Cool on sheet 5 minutes. Transfer chocolate cookies to racks and cool completely.

For filling:
Sift the powdered sugar. In the bowl of an electric mixer fitted with the paddle, beat the butter and powdered sugar until combined--it will look crumbly. Add the milk in a slow stream, then the mint extract and the salt.

Once combined, scrape down the sides of the bowl and the paddle, then turn the mixer to medium speed and beat until light and fluffy, 2-3 minutes. Add a drop or two of red or pink food coloring.

Assembly

When you're ready to assemble the cookies, put the unwrapped candy canes in a large Ziploc bag and use a rolling pin to crush them into very fine pieces, almost crumbs. You could also use a food processor for this task. The crumbs get sticky if exposed to air for long periods of time, so save this step until you're ready to use them.

Pipe or spread 2 generous teaspoons of filling evenly over flat side of 1 cookie to edges; top with another cookie, flat side down, pressing gently so that the filling comes all the way to the edge of the cookies.

Place the crushed candy canes on a plate or in a shallow bowl. Roll the edges of the cookie sandwiches in crushed candies.

Read More...

Monday, November 29, 2010

TWD: Devlishly Good Chocolate Shortcakes

Whew! One major holiday down, one big one to go. Now that I have somewhat recovered, I can tell you that Thanksgiving was epic. My friends, we had three pies and one cake for four adults. Plus whipped cream. And ice cream. It was obscene. There are not enough stretchy-waisted pants in the world to satisfy me after the last week of pie scarfing and cookie dough ball chowin'. So how did I end up making yet another dessert?

Well, when said dessert involves a little of this...

...yeah.

I AM POWERLESS IN THE FACE OF GANACHE. If someone ever puts that slogan on a t-shirt I'll buy one in every color.


This week's TWD recipe was for "Devilish Shortcakes," a chocolate variety of the traditional shortcake. Early bakers reported that they weren't very flavorful on their own, so I decided to jazz mine up with some (woefully out of season and somewhat disappointing) raspberries, whipped cream, and a bittersweet chocolate ganache.

Despite outwardly resembling some things that cannot be mentioned in delicate company, these biscuit-like shortcakes had a nice, subtle chocolate flavor. I used Valhrona cocoa powder, which helped give them some oomph, and I think adding some finely chopped chocolate next time would also be a good idea.


When topped with the berries, soft whipped cream, and warm chocolate sauce, they were pretty incredible. I loved that they were tender on the inside and a little crunchy on top--it reminded me of eating the top layer of a chocolate cake, and everyone knows cake top is the best part! They were mixed and baked in about 25 minutes, which is faster than any chocolate cake I've ever made.

What did everyone else think? Were you all desserted out, or up for a chocolatey diversion?

Read More...

Friday, November 26, 2010

Adventures in Cookie Dough Balls

It's the day after Thanksgiving, which means most of us are lolling around, trying to shake off yesterday's food coma while simultaneously justifying today's breakfast of pumpkin pie + whipped cream (vegetables and dairy!). So I really have no business posting about more desserts, especially desserts that are completely unrelated to pumpkins, apples, pilgrims, or Indians.

But.

I have recently been inducted into the mysterious world of cookie dough balls, and I really can't keep it to myself.


Cookie. Dough. Balls?

Oh yes. These are balls of cookie dough baked until barely set in the middle, so that they can be handled like a cookie but retain most of the taste and texture of cookie dough. Think they sound awesome? You're totally right.

I tried two very different recipes, one for chocolate chip, and one for peanut butter chocolate chip. I don't feel like either is my perfect recipe, so I'll probably keep tweaking them, but let's face it, I'm not going to kick these cookie dough balls out of bed, so I figured I'd share the love while I labor in the Cake or Death kitchen perfecting them.


First up: Chocolate Chip Cookie Dough Balls. These were basically a modified chocolate chip cookie dough, with less butter and more flour, baked cold so that they spread a bit less. While the end result was pretty tasty, I thought the dough needed more sugar, and the cookies were closer to actual cookies than dough balls, even though I baked them less than the time recommended.

The thing is, even imperfect cookie dough balls are still REALLY good. We polished these puppies off posthaste.


Next: peanut butter chip cookies. These were modified from a vegan recipe (hello, buttah) but they could easily be made vegan, since they don't have any eggs and you can re-substitute vegan margarine for the butter. The big difference in these cookies is that they use powdered sugar instead of granulated, which made a huge difference in the texture and produced a much stiffer dough without adding more flour.

The dough was actually too dry and crumbly for me, but after I added a little invert sugar, it held together well and produced this sexy beast:


Soft, melting, but with a slightly crisp exterior...these were seriously good. So if you haven't died of a sugar overdose yet, the recipes are below with my notes and suggested changes. And you'd better believe I'm going to keep fiddling with these until I find the perfect recipe...stay tuned.


Chocolate Chip Cookie Dough Balls
original recipe from The Chic Life, my changes in red brackets

1 1/2 cups unbleached all-purpose flour
1/2 tsp salt
1/4 tsp baking powder
1/8 tsp baking soda
1/2 cup brown sugar
3/4 stick butter, softened/room-temp
1 tbsp sugar [I would bump this way up, at least 1/3 cup. Next time I'm going to try powdered sugar instead of granulated, too]
1 egg (or flaxseed-egg)
1/2 tsp vanilla
1/2 cup semi-sweet chocolate chips [I used 1 cup and had no regrets]

In a large bowl, whisk together flour, salt, baking powder, baking soda.

In a medium bowl, mix sugars and butter till creamy. [I used a stand mixer, but DON'T beat these until light and fluffy. You don't want to add extra air, which will cause them to spread.] Add egg and vanilla and mix till combined.

Mix wet into the dry. Note: it will appear there is not enough liquid for the amount of dry ingredients, but continue mixing. It will form into a dough, it will just be a firm dough. Careful to not overmix.

Gently fold chocolate chips into the dough, without overmixing.

Refrigerate dough for at least 20 minutes before using a small sorbet scoop to scoop out dough into small mounds. Roll each mound into a ball and spread evenly on a baking sheet, leaving roughly 2-3 inches between each ball. Preheat oven to 350 and spread parchment on baking sheets.

Bake balls for 10-14 minutes, depending on how set you want your centers. [I baked for 9 and thought I could have gone a little less]. Let your dough balls rest on the baking sheet to cool at least 5-10 minutes.


Peanut Butter Cookie Dough Balls
original recipe from Peas and Thank You, my changes in red brackets

1/2 c. non-dairy margarine [I used sweet, sweet butter]
3/4 c. natural peanut butter [I used 1 cup]
1/2 c. organic brown sugar
3/4 c. organic powdered sugar
1/2 t. vanilla extract
1 t. baking powder
1/2 t. baking soda
3/4 t. salt
1 c. whole wheat pastry flour [I used 1.5 cups AP]
1/2 c. unbleached organic flour [see above]
1/2 c. natural peanut butter chips
1/2 c. non-dairy chocolate chips
[I added 2 tbsp invert sugar]**

Using a stand mixer, beat margarine, peanut butter, sugars and vanilla until fully incorporated.

In a separate bowl, combine baking powder, baking soda, salt and flours.

Add dry mixture to the mixer bowl a little at a time. Mix until a dough forms, add chips, c
combine and chill dough for 30 minutes.

preheat your oven to 350 degrees. Scoop dough with a mini ice cream scoop (or your fingers) and place balls on a cookie sheet. Bake for 10-12 minutes. [I baked for 10 minutes, they were perfect.] They’ll still be soft and look much like they did going in, but don’t overbake. Let the dough balls rest on the pan for a minute before transferring to a cooling rack.

**Invert sugar is a liquid with a consistency similar to corn syrup, composed of glucose and fructose. A good scientific overview can be found here. It's great to add to cookies if you want them to stay moist and gooey, and it's also great in candies to prevent crystallization and to keep ganache fudgy and soft.


Final Thoughts
I loved the addition of invert sugar--it made the cookies stay really soft and moist and doughy. However since it's not as readily available in grocery stores, I'd like to try to get to a recipe that produces the same effect with common sugars. I think the key is finding the right mix of brown, granulated, and powdered sugars to give them structure without drying them out. More experimenting to come!

Read More...

Monday, November 15, 2010

TWD: Cranberry-Lime Galette

For many of us, the capital-H Holidays are approaching, and I don't know about you, but I feel like I've already been run over by a festive seasonal truck and it's barely mid-November. The last few months I've felt like Wile E. Coyote frantically churning my legs in midair, trying to run across the sky without looking down. All of which is to say, I'm sorry I haven't been reading and commenting much on blogs. Or blogging here, for that matter. Or showering as often as I should. (I guess that last one mostly applies to the husband. Love youuuuu.)

The hectic pace recently has made me grateful for simplicity wherever I can find it, like in this week's Cranberry-Lime Galette:

Galettes, or as I like to call them, "pies for lazy people," are a genius invention. Pie dough is piled high with filling, then the edges are folded over and the whole thing is baked on a cookie sheet. No tearing of misshapen top crusts, no crimping of edges, and no trying to wiggle perfect slices out of a reluctant pie tin. It's just fill, fold, bake, and devour. Near-instant gratification.

The filling in this case was a seasonal blend of fresh cranberries, dried cranberries, and apples, plus a surprise sneak attack from lime zest, lime juice, and fresh ginger. I cut down the amount of fresh ginger and it still shone through beautifully. This galette contained a lot of strong flavors, but they all worked surprisingly well together.

I continued my love affair with spiced whipped cream and made another batch flavored with vanilla and cinnamon to top this galette. I think cream--or possibly ice cream--is definitely necessary to mellow the tart flavors and balance everything out. So you have my permission--nay, my orders--to eat this with gobs of whipped cream. It's necessary! And oh so delicious.

You guys, I don't want to freak you out, but Thanksgiving is next week. When did this happen, and what are we going to do about it?? Have you all started planning your menus? Forget all the turkey junk, what are you making for dessert? I'm thinking the Cranberry Shortbread Cake is going to have to make another appearance.

Read More...

Tuesday, November 09, 2010

TWD: Cranberry Shortbread Cake

Yesterday afternoon, as I was spoiling my husband's dinner by force-feeding him cranberry cake and whipped cream, he looked me in the eyes and said, with great feeling, "Miy WOUFF Troiusdapes miff Rorfty!"

Fortunately, we have been married long enough that I'm able to translate Full Mouth into English, and knew that he was saying that he loved Tuesdays with Dorie. I have to agree! I have so many wonderful cookbooks that I only consult when I'm baking for a special occasion. I'm sure Baking: From My Home to Yours would be one of those without a weekly obligation to make and blog about a recipe. I'm not sure I ever would have made this Cranberry Shortbread Cake without the prodding of a baking group, but I'm so glad I did.


First, we must discuss this dessert's identity crisis. Shortbread...cake...? Que? To me it tasted most like a double-crusted tart, which is definitely not a bad thing. The crust was similar to a sugar cookie dough, with a great mix of a crackling sugary crust and a tender crumb inside.


Inside is a simple cranberry-orange jam, with enough sugar to round out the tart edges but enough bite to balance the sweet dough. I chickened out a little with the filling, and didn't use all of it because it seemed like it might overwhelm the thin crust. In retrospect I could have used the full amount, but it didn't seem to be lacking for flavor, either.


The real kicker, for me, was the softly whipped cream on top. I added lots of vanilla and a little cinnamon and freshly grated nutmeg to the cream, and the combination of spices, aromatic vanilla, and sweet cream on the tart cranberry cake was fantastic. I'm not usually much of a whipped cream fan, but I wanted to put this in a Big Gulp cup and drink it with a straw.

Not that that actually happened.

Ahem.


The final touch was a few of these glazed cranberries. The recipe couldn't be easier--fresh cranberries dunked in whisked egg whites, then rolled in granulated sugar. After an hour or two the sugar crust gets hard, so they almost explode in your mouth when you bite into them. The berries are juicy and fairly sour, but the sugar keeps them from being too lip-puckering. These were the perfect finishing touch to an already perfect dessert. I'm looking forward to experimenting with this recipe and using sauteed apples for the filling, and maybe a strawberry/rhubarb combination come spring.

Read More...

Tuesday, November 02, 2010

TWD: Peanuttiest Blondies

I'm more than a little obsessed with peanut butter--well, with nut butters in general. In my cupboards I have 4 different kinds of peanut butter and 3 other nut butters, and that's not even counting the coconut butter variations. Some might say I have a problem with nut butter consumption, but one person's problem is another person's pleasure.


I have found ways to have peanut butter in practically every meal. In the mornings before I run I have a "banana taco," a banana cut in half lengthwise and spread with a thick layer of chunky peanut butter. I like to have some with my afternoon apple, and I have been known to add a spoonful to soups or stews to give it a hearty, thick flavor. I also have a habit of running my finger around the inside of the jar and then sprinkling the peanut-butter smeared finger with chocolate chips before gnawing on it, but that's not what we're talking about today.

Today we're talking about peanut-chocolate blondies:

I don't mean to be a stickler, but if you're calling something "peanuttiest blondies" I expect to be punched in the face with peanut flavor. These were good, no doubt about it, but I thought the actual peanut taste was pretty mild, considering they had chopped peanuts, peanut butter, and I subbed some peanut flour for regular AP in the mix. I did add quite a bit of chopped chocolate to the mix, so the overall effect was of a peanuttyish chocolate chip bar.

Oh, and I think I overbaked them. I've had a fear of underbaked bar cookies ever since I created this hot mess back in July:

So I had a "better safe than sorry" policy where these bars were concerned, and they took their sweet time in the oven.


Still, these were eagerly devoured around the house and by J's students, and I found that just a thin layer of peanut butter smeared on top made them perfect for me!

Read More...

Sunday, October 31, 2010

The Secret to Stress-Free Birthday Cakes

Today I would like to share the #1 secret to making amazing birthday cakes without breaking a sweat. It's not having all the fancy kitchen gadgets, although some specialty tools can help. It's not taking expensive baking classes, although you can learn lots from great teachers. And it's not using expensive ingredients, although sometimes it's worth it to pay more. No, the #1 secret to stress-free baking is to watch the time.

Allow me to illustrate this very important principle with an example. Well, it's really more of an anti-example...


This is Ryan. You may remember him from such previous cakes as the Baby You're A Rock Star cake, which he enjoyed while still in the womb. (Aw, baby's first taste of sugar.) Ryan recently celebrated his first birthday and I was lucky enough to be asked to do the baby cake and mini cupcakes for the party. Here's how it went down:

Get the email with the party details, everything's great.
Finalize the numbers and flavors and decorating ideas, everything's great.
Do all the prep work the day before, everything's great.
Get up the morning of the party and get started baking the cupcakes and decorating the cake. Everything is still great.

After a leisurely morning of swanning around the kitchen, fiddling with different tasks, I check my email to make sure that I have everything covered and all the details in order. Only then, upon closer reading, do I discover that I mis-read the party invitation and what I thought was the start time was actually the end time. Suddenly I am running an hour and a half behind, and the party is supposed to start in 10 minutes. And the cake's not quite done. And the cupcakes aren't frosted or decorated. And I haven't showered yet. And, oh yeah, it's a 25 minute drive to the party house. Commence panic.

The next 45 minutes were spent tearing around the house like a Tasmanian devil, piping cupcakes like a madwoman, trying to strike a balance between finishing everything and not being unforgivably late. It was not my finest moment.


Of course, this story has a happy(ish) ending. I made it to the party about an hour late, which, while embarrassing, still left plenty of time to have Ryan eat the cake and let the guests enjoy the cupcakes. My friend Jane, the hostess, was beyond gracious and understanding. And the cake and cupcakes turned out pretty well. There were things about the cake I didn't have time to fix, and cute fondant cut-outs that didn't make it on top of the cupcakes, but I'm trying not to focus on the negatives.


The guidelines Jane gave me were to use shades of blue, green, and brown, and to try to work in a striped pattern. I did that for the bottom layer, but since I know Jane is a wee bit fond of obsessed with argyle I thought it would be fun to do one of the layers in an argyle pattern. It turned out to be my favorite look, by far. I wish I'd done all the layers argyle...but then I would have been about 4 hours late to the party!


This picture is for my adolescent self, who would scowl in geometry class and huff, "When will I ever use this in real life?" Drink it up, Past Liz, you could have used a little more geometry learnin' this weekend. Diamond measuring is hard work.

I made the 1 out of rice crispy treats, which is a fabulous trick when you need to sculpt something with hard edges or difficult details. I didn't love how the plaid turned out, so next time it's all argyle all the way. Live and learn!

It wouldn't be a post about a first birthday cake without a few pictures of the cake carnage.

This picture pretty much sums up Ryan's whole attitude toward the cake-eating. He was extremely suspicious of the whole enterprise--I think he thought we were playing a trick on him.
After taking a few exploratory bites, he found what he really loved about the cake: pounding it flat. He made like Animal and wailed on the cake, sending cake shrapnel flying through the air. I laughed, and then I cried, and then I took about a million pictures.
The end result was a horrifying swamp of cake and frosting covering him, and his high chair, and a swath of floor around him. Good thing there were cupcakes for the guests to enjoy, because no one was eating that cake when he was done with it.

I made two kinds of mini cupcakes: S'mores and Caramel Apple.

The S'mores cupcakes were a rich chocolate devil's food, with a thin layer of graham crumbs on the base and a sprinkling of graham on top before they baked. The cupcakes were topped with a vanilla marshmallow frosting that was lightly torched for that toasted marshmallow-round-the-campfire flavor.
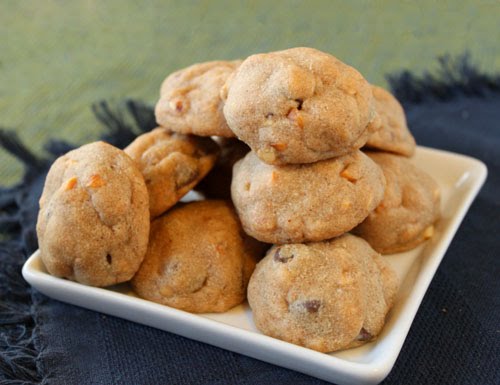
The caramel apple cupcakes were the brainchild of Jane's husband, Seth. I was actually a little less excited about them because to me, apple cupcakes = muffins. And we all know muffins aren't so exciting. However, it turns out if you add enough sugary accessories to apple cupcakes, they're awesome. Here they were filled with a mix of caramel sauce and apple butter, then topped with a caramel buttercream and a caramel drizzle.

The S'mores and Apple Caramel Cupcake recipes are below.


S'mores Cupcakes

Basic Chocolate Cupcakes
Yield: 1-6" round, 1-4" round, and 48 mini cupcakes (make a 2/3 batch if you just want 48 mini or 24 regular cupcakes)

9 oz butter, softened to room temperature
1 cup granulated sugar
1 cup brown sugar
3 eggs, room temperature
1 tbsp vanilla extract
1 tbsp chocolate extract (optional)
1.5 cups buttermilk, room temperature
3/4 cup sour cream, room temperature
3 tbsp lukewarm coffee (can use water instead)
2-2/3 cup all-purpose flour
1.5 cups BEST QUALITY cocoa powder, Dutch-processed (I use Valrhona)
2-1/4 tsp baking soda
1 tsp salt

Preheat the oven to 350 degrees F. Line cupcake pans with paper liners.

In the bowl of an electric mixer fitted with a paddle attachment, cream the butter and 2 sugars on high speed until light and fluffy, approximately 5 minutes. Lower the speed to medium, add the eggs 1 at a time, then add the vanilla and mix well. In a separate bowl, whisk together the buttermilk, sour cream, and coffee. In another bowl, sift together the flour, cocoa, baking soda, and salt. On low speed, add the buttermilk mixture and the flour mixture alternately in thirds to the mixer bowl, beginning with the buttermilk mixture and ending with the flour mixture. Mix only until blended. Fold the batter with a rubber spatula to be sure it's completely blended.

Divide the batter among the cupcake pans (1 rounded standard ice cream scoop per cup is the right amount). Bake in the middle of the oven for 20 to 25 minutes, until a toothpick comes out clean. Cool for 10 minutes, remove from the pans, and allow to cool completely before frosting.

To make S'mores variation: mix 1 cup graham crumbs with 1/4 cup granulated sugar. Melt 1/4 cup butter and stir it into the graham mixture. Place a small spoonful (about 1/2 tsp) of graham mixture in the bottom of each muffin cup and press it down evenly. Fill the cups with cake batter, then sprinkle more graham on top of each before baking.

Marshmallow Frosting
8 large egg whites, room temperature
2 cups granulated sugar
1/2 teaspoon cream of tartar
2 teaspoons vanilla extract

Place egg whites, sugar, and cream of tartar in the bowl of an electric mixer. Set over a saucepan with simmering water. Whisk constantly until sugar is dissolved and whites are warm to the touch, 3 to 4 minutes.

Transfer bowl to electric mixer fitted with the whisk attachment, and beat, starting on low speed, gradually increasing to high, until stiff, glossy peaks form, 5 to 7 minutes. Add vanilla, and mix until combined. Use immediately.

After piping on cupcakes, use a kitchen torch to lightly toast the outside of the frosting. If you don't have the torch you can try sticking them under the broiler for 20-30 seconds at a time, carefully watching them the whole time. I have a very old, very crotchety oven that doesn't heat evenly, so I wouldn't trust it to brown these sufficiently, but you may have better luck.


Caramel Apple Cupcakes

Apple Cupcakes
Yields: about 55 mini cupcakes

2 1/4 cups all-purpose flour
1 teaspoon baking soda
1 teaspoon baking powder
2 teaspoons ground cinnamon
1/2 teaspoon ground nutmeg
1/2 teaspoon ground cloves
1/2 teaspoon ground ginger
1/2 teaspoon ground allspice
1 teaspoon salt
1/2 cup (1 stick) unsalted butter, softened
2 cups sugar
2 large eggs
1 teaspoon pure vanilla extract
4 cups coarsely shredded apples, liquid squeezed out

Preheat oven to 350 degrees. Line muffin tins with paper liners; set aside. Whisk together flour, baking soda, baking powder, spices, and salt in a medium bowl; set aside.

Put butter and sugar into the bowl of an electric mixer fitted with the paddle attachment; mix on medium-high speed until pale and fluffy, about 5 minutes. Mix in eggs and vanilla. Reduce speed to low; mix in apples. Don't worry if the batter looks broken at this point. Add flour mixture; mix, scraping down sides of bowl as needed, until just combined.

Divide batter among lined cups, filling about 3/4 full to get generous, crowning apple cupcakes. Bake until tops are springy to the touch, about 15 minutes for mini cupcakes. Remove cupcakes from tins; transfer to a wire rack; let cool completely.

Brown Sugar Buttercream
Yield: enough to frost 55+ mini cupcakes (7-8 cups?)

8 large egg whites, room temperature
2.5 cups packed dark brown sugar
1/2 tsp salt
5 sticks (20 oz) unsalted butter, soft but cool to the touch

Put egg whites, sugar, and salt into the bowl of a standing mixer set over a pan of simmering water. Whisk constantly, until hot to the touch, about 5 minutes.

Beat in the mixer using the whisk attachment on high speed until stiff, glossy peaks form, and the bowl is no longer hot to the touch, about 6-8 minutes. Reduce speed to medium-low. Add butter, 2 tablespoons at a time, beating after each addition. It's normal for the meringue to deflate and look soupy at this point. If your meringue wasn't hot when you started adding it, and your butter was cool but supple to the touch, you should be okay. Beat until frosting is smooth and glossy, 3 to 5 minutes. Buttercream can be refrigerated airtight for up to 3 days; bring to room temperature, and beat before using.

Caramel Sauce
Yield: about 2 cups

1/2 cup water
2 cups granulated sugar
4 tablespoons light corn syrup
1 cup heavy cream, warmed to 100 degrees F
1/2 cup full fat sour cream
1 teaspoon fresh lemon juice
Pinch salt (less than 1/8 teaspoon)

Combine the water, sugar, and the corn syrup in a medium saucepan. Stir them together with very clean fingers, making sure no lumps of dry sugar remain. Brush down the insides of the pan with a little water, using your hand to feel for any stray granules of sugar.

Cover the saucepan and place it over medium heat for 4 minutes. After 4 minutes, remove the lid, increase the heat to high, and bring to a boil. Do not stir from this point on. Keep an eye on the pan. It will be very bubbly. When stray sugar crystals appear on the side of the pan, brush them down with a wet pastry brush.

As the sugar cooks, the bubbles will get larger. Insert a candy thermometer, and when the temperature reaches 300 degrees F, lower the heat to medium, which will slow the cooking. Continue to cook the sugar until it reaches 350 degrees F. It will be dark brown. Remove the pot from the heat and let it sit for 1 minute, or until the bubbles subside.

Add the cream to the caramel. It will bubble up vigorously, so be careful.

Vigorously whisk in the sour cream, lemon juice, and salt. This sauce is now ready to be served warm or cooled to room temperature. It will keep stored airtight in the refrigerator for up to 1 month.

To make the caramel buttercream:
Have buttercream in the bowl of a mixer fitted with the whisk attachment and turn mixer to medium-low. With mixer running, add about 3/4 cup of room temperature caramel sauce--it should be the same temperature as the buttercream, not warmer or cooler. Once it's completely incorporated taste the frosting, and add a bit more caramel if you want the flavor to be more pronounced.


To assemble the caramel apple cupcakes:
Poke a hole in the middle of each cupcake. I mixed together some caramel sauce and apple butter, since I had apple butter languishing in the refrigerator, but you can use straight caramel sauce if you want. Squirt a little sauce in the center of each cupcake. Pipe the caramel buttercream on top, and finish with a drizzle of the remaining caramel sauce.

Read More...