Jason & I are not one of those "twinny" couples who seem to belong together at first glance--in fact I think our relationship sometimes mystifies people who don't know us very well. Although I think we're pretty well matched in the important areas, it's true that we're opposite in many ways. I love to run long distances, he would be happy never standing up from his chair. He could talk politics all day long, but just the thought of that makes me want to jam earphones in my ears. He's a people person, I'm working on the title of World's Youngest Curmudgeon.
Yes, Paula Abdul, you were right all along. Opposites do attract.
We also have differing tastes in food and desserts. I'm a pure chocolate girl, but Jason's heart belongs to caramel. Chewy, buttery, rich, slips through your teeth caramel. So when I saw this recipe for Salted Caramel Bars, I knew I had to make them for him.
These bars don't have many components, but they make every ingredient count. The base is an ultra-buttery, crisp shortbread. The thick caramel layer is chewy without being sticky, and sweet without being cloying, thanks to the generous spoonful of salt in the recipe.
The best part, though, are the large sea salt flakes that are scattered on the bars just before serving, to add a crunch and a savory bite that perfectly contrasts with the caramel.
These bars really satisfied both of us. Jason loved the caramel component, I liked how easy they were to make, and we both enjoyed the crunchy salt on top. Not to mention the fact that when his mouth is full of caramel, it's harder to hold a sustained conversation about politics.
Just sayin'.
Being the chocolate advocate in the household, I actually tried to top these with chocolate ganache, but the combination of cream-filled ganache and buttery caramel meant that the layers didn't coalesce and the ganache had a tendency to slide off. I still think chocolate can be incorporated somehow--perhaps pure chocolate, drizzled on top? Dunking the bars shortbread-side first into tempered chocolate? Further experimentation is needed.
Salted Caramel Bars
Crust:
10 tbsp unsalted butter, melted
1/2 cup sugar
1/2 tsp salt
1 egg yolk, whisked
1 2/3 cups AP flour
Caramel Layer:
1 cup unsalted butter
1 cup light brown sugar
12 tbsp light corn syrup
1 tsp sea salt
4 tbsp sugar
4 tbsp heavy cream
1 1/2 tsp pure vanilla extract
Sea salt flakes
Pre-heat oven to 350 degrees and line a 9-by-9-inch pan with parchment paper with the edges of the parchment hanging over the sides. This will make removing the bars easier.
In a large bowl combine the melted butter, sugar and salt with a fork. Add the yolk and combine with the fork. Add the flour and using your hands, combine the dough until its flaky. Transfer the dough into the parchment lined pan and press down with your hands or the bottom of a measuring cup. Refrigerate this for 30 minutes. Once chilled, bake for 27 minutes until lightly browned.
Once baked, remove and set aside to cool.
Meanwhile, in a pot combine the topping ingredients; butter, brown sugar, corn syrup, salt, sugar and cream. Bring to a boil and make sure all the sugar is dissolved. Insert a candy thermometer and cook, stirring occasionally, until it reads 250 degrees F. Remove from heat, stir in vanilla extract and pour on top of the shortbread.
Refrigerate for 2-4 hours. Then sprinkle with the sea salt flakes and serve! If you have leftovers, keep them refrigerated because the caramel will soften and gradually lose its shape at room temperature.
Sunday, January 30, 2011
Salted Caramel Bars
Friday, January 28, 2011
Lemon-Mascarpone Layer Cake with Edible Flowers
Over Christmas break I stopped by to see my old high school friend Claire. As I was leaving, she offered me lemons from her overflowing tree. My first instinct was to decline, since I was staying with my parents and had no interest in shlepping random lemons back home with me in my already-overstuffed car. Plus, I had chocolate buche de noel on the brain, not lemons.
However, once I saw that her tree was full of Meyer lemons, I did a ten-point vault over her head and raced to the tree, yelling at her to dust herself off and bring the biggest cardboard box she could find. As a result of my wanton selfishness, I ended up with a generous supply of this awesome fruit.
Most folks are probably familiar with Meyer lemons, but if you're not, here's a handy visual comparison:
The usual lemon suspect, the Eureka lemon, is on the left. It's a light yellow color, with a thick rind and a sour citrus flavor. The Meyer lemon is on the right. They're usually rounder than the traditional lemon, with a yellowy-orange color, a thin rind, and a perfumey, almost floral fragrance. Wikipedia tells me it's thought to be a cross between a lemon and an orange, which makes sense, since it's juice is sweeter and more complex than the usual super-tart lemon juice.
But enough lemonology. The question is, what did I do with them? Well, Claire handed me Meyer lemons, and I made Lemon Mascarpone Layer Cake:
Two of my good friends had birthdays this month, so a group of us got together for a girl's night out to celebrate them. We could have had desserts at the restaurant, but there's something special and personal about a homemade birthday cake, and I wanted them to feel the love, so I arranged with the restaurant to bring our own cake.
The cake I chose was from The Art and Soul of Baking, a beautiful cookbook given to me by another friend. A basic genoise cake is brushed with lemon syrup and layered with lemon curd and a lemon-mascarpone-whipped cream mixture. The result is a light, pillowy cake that is almost like a trifle, it's so creamy and moist. If I had any criticism it's that the lemon flavor and lemon curd layers could have been heavier, so in the instructions below I've changed the quantities to suit my tastes.
But what really makes this cake special are the flower decorations, and that part couldn't be easier. Here, I've written all the steps out for you:
1. Go to Whole Foods or another upscale grocery store
2. Buy organic "Edible Flowers"--they're usually in the prepackaged herb section
3. Put edible flowers on cake
4. Bask in warm glow of compliments and adoration
Edible flowers are stunningly beautiful, and require absolutely no work or skill to decorate with. I really can't recommend them enough. In answer to the inevitable question "But what do they taste like?" the answer is pretty much...nothing. They have a slight green taste, sort of like a lettuce leaf, but in general it's like a whole mouthful of nuthin'. Because the cake was heavily loaded with flowers, we ate some but ended up leaving some on our plates. I think of them like fondant--a beautiful decorating touch but not necessarily meant to be consumed with the cake.
And here's the secret to getting a birthday plaque to stay at an angle: lots and lots and lots of whipped cream! It's a very lucky birthday girl indeed who got that piece of cake.
Read on for the full recipe, and don't be intimidated by all the steps! It can easily be modified by using your favorite sponge (or box) cake, store-bought lemon curd, and simple whipped cream instead of the whipped cream-mascarpone mix.
Lemon Mascarpone Layer Cake
adapted from The Art and Soul of Baking by Cindy Mushet
For the cake
[you can subsitute any light sponge cake you like in this recipe]
6 large eggs, separated
6 oz (14 tbsp) sugar, divided use
6 oz (1.75 cups) sifted cake flour
Zest of one lemon
Preheat the oven to 375 F. Line two 9" cake pans with parchment paper, but do not grease them in any way.
Whip the egg yolks with half of the sugar (3 oz, or 7 tbsp) in the bowl of a large stand mixer on high speed for 5 minutes, until they are very thick and light in color. Transfer the yolks to a separate bowl and wash the mixing bowl and whisk very well.
Whip the egg whites in the cleaned mixing bowl until soft peaks form. Gradually add the remaining 3 oz/7 tbsp sugar a spoonful at a time, while mixing on high speed, until the egg whites hold firm peaks.
Fold one-third of the egg whites into the yolks with a spatula, then sift half of the cake flour on top and gently fold it in. Fold a second third of the egg whites into the yolks, sift the remaining cake flour on top, then fold that in. Finally, add the last of the egg whites, and when they're almost incorporated, add the lemon zest and fold until everything is mixed together.
Divide the batter between the two pans and bake for 18-22 minutes, until the tops are golden, firm, and a toothpick inserted in the center comes out clean. Transfer the cakes to a rack to cool completely.
For the lemon syrup
1/2 cup granulated sugar
1/2 cup water
1/4 cup fresh-squeezed lemon juice
Heat the sugar and water in a small saucepan over medium-high heat, stirring occasionally, until the sugar dissolves and the liquid is clear. Remove from the heat and stir in the lemon juice. Allow to cool completely before use.
For the lemon curd
5 large eggs
5 egg yolks
1.5 cups sugar
1 cup + 2 tbsp fresh lemon juice
9 tbsp (4.5 oz) cold unsalted butter, cubed
Fill the bottom of a double-boiler with 2 inches of water and bring it to a simmer.
Place the eggs, yolks, and sugar in the top of the double boiler (off the heat) and whisk until blended. Add the lemon juice and mix well. j
Place the egg mixture over the simmering water and cook, whisking constantly, until the curd reaches 180 F on a candy thermometer. (If you don't have a thermometer, it should thicken enough to coat the back of a spoon.) Don't let the curd boil, or you'll have bits of scrambled egg in your curd.
Once cooked, strain the curd through a metal strainer into a bowl. Add the cold butter pieces to the curd, and whisk gently until the butter melts and the mixture is velvety-smooth. Press a layer of cling wrap on top of the curd and refrigerate it until it is cool, at least 3-4 hours or overnight.
For the mascarpone filling
2.5 cups (20 oz) heavy whipping cream
3 oz (7 tbsp) granulated sugar
1 lb mascarpone, I suggest making your own if you have time--it's much better and cheaper
Place the cream and sugar in the large bowl of a stand mixer and whisk until they form firm peaks, but do not over-beat or it will become grainy and curdled.
In a large bowl, combine the mascarpone and 1-1/2 cups of lemon curd, and stir until they're well-mixed. It should be the consistency of pudding. Gently fold the whipped cream into the mascarpone mixture, being careful not to overmix, or the mascarpone will look grainy and separated. If this happens, stir in a spoonful or two of heavy cream to smooth it out.
To assemble the cake
Unmold the cakes, and use a sharp serrated knife to cut each one in half, so you're left with four thin cake rounds. Place one round on a cake cardboard and brush it with a quarter of the lemon syrup.
Spoon about 1/3 cup of the mascarpone filling on top of the cake round, and use a spatula to spread it evenly around. Top the mascarpone with about 1/3 cup of lemon curd, and spread it in a thin layer.
Place another cake round on top of the first, and brush this one with an equal amount of lemon syrup. Repeat the layer of cake rounds, lemon syrup, mascarpone, and lemon curd until you have added the final cake round to the top of the cake. Brush the top with the remaining lemon syrup.
Spread the remaining mascarpone mixture along the top and sides of the cake. If you have lemon curd left over, you can pipe dots of lemon curd along the top of bottom border of the cake (or you can just save it to eat on toast and oatmeal!)
This cake is best made a few hours--or even a day or two--in advance, so the flavors and textures have a chance to meld.
Tuesday, January 25, 2011
TWD: Nutty Swirly Sour Cream Bundt Cake

I'm a little late posting this amazing bundt cake I made over the weekend, but I have a good excuse. Her name is Madeline, and she is verrrrrry distracting.
My niece is visiting for a few days, and we've had a swell time getting to know each other better. Madeline's likes include Olivia the Piglet, swinging, knocking down her wooden giraffe, and playing hide-and-seek. Her dislikes include going to bed on time, sun in her eyes, dirty hands, and, until recently, my baking.
I know. I KNOW. The last time I baked for her, I made a mini cake for her 1-year birthday. This was pretty much the reaction I got. Completely underwhelmed. So of course I was anxious to make a good impression this time around.
I brought out a secret weapon: a rich chocolate ganache glaze atop the cake, with more available to serve on the side.
I also tried to be generous with the flavors, using brown sugar, lots of bittersweet chocolate chunks, and fresh-grated cinnamon in the bundt's swirly layers. After all, 20-month olds are well known to have finely developed palates.
I think my strategy worked, because all of us--toddler included--loved this cake! This is the second Dorie bundt cake the has completely blown me away (the first being the Double Apple Bundt Cake).
It was rich, it was moist, it was flavorful, with the tang of sour cream and orange zest, and the thick swirl of chocolate, brown sugar, and cinnamon. This is a cake dainty enough to be served in small slices with tea, but delicious enough to be eaten out of the hand standing over the sink. Not that I would know that from experience.
This is a keeper and a make-again (and again, and again) for sure. In fact, I might be making it sooner rather than later, because her highness was none too pleased to find out the cake's completely eaten:
Monday, January 17, 2011
TWD: Lemon Poppyseed Muffins
Hello, little blog. It's been awhile. You've probably missed me, since the last post was about New Year's Eve and it's now the middle of January. You've been sitting around feeling unfashionably behind the times. I'm sorry.
I haven't missed you too much, since I've been doing lots of traveling and LOTS of dessert eating. Don't be jealous, it was all in the name of blog research, and I'll have some fun pastry posts up shortly.
But in the meantime, let's spruce you up with some new content! Will muffins suffice?
I made these lemon poppyseed muffins a few weeks ago over--not to bring up a sore subject--New Year's Eve. My brother and sister-in-law were in town visiting, hooray!
But we were all sick and feeling pretty lousy after NYE, boooo!
The day after New Year's, we literally sat around the apartment all day. We had fuzzy heads and stuffy noses and scratchy throats and lazy bones. It was gray and rainy outside. We took lots of naps. Time seemed to drag on, and we couldn't quite find anything to keep us properly entertained.
It was a weird day, in the way that sick days often are.
We had also overdosed on too much junk food over the holidays and were feeling the need for nutritional atonement. For brunch that day, I sliced up every fruit in the house and threw it in a big bowl with a hefty squeeze of orange juice over it. I scrambled some eggs, set out the tangerine juice, and served these lemon poppyseed muffins, warm from the oven.
Okay, so maybe muffins aren't the most virtuous of breakfast foods, but in comparison to everything we'd been eating the week before, they're practically a vegetable.
But what really matters is the taste. These muffins were like liquid sunshine, bright and tart, with a little earthy crunch from the poppyseeds. The sour cream kept them moist and cakey, but the high baking temperature gave the tops that sugary crust that I so love.
They may not have come in a bottle from the drugstore, but these light and lemony muffins were all the medicine we needed that day.
Monday, January 03, 2011
TWD: Midnight Crackles
HAPPY NEW YEAR!
How has this happened? I wasn't even used to saying twenty-ten yet, and now we're already on twenty-eleven. (Cue old-lady grumping about the passage of time and kids these days.)
We had an exciting New Year's Day. I'll give you a hint: it involved giant dragons...
...and marching bands...
...and horned frogs (ew)...
...and Paula Dean, y'all!
Yes, we had front & center seats for the Rose Bowl Parade! We live about 3 blocks from the parade route so we got together with some friends and camped out the day before and staked out some prime real estate. Let me tell you, people here take their parade viewing verrrry seriously.
Dibs started at 7am the day before the parade, and folks basically stayed in their spots for the next 24 hours on the street. It was pretty surreal to be camped out in front of the local Indian buffet at 3:30 AM, playing games, warming our hands by the fire in the BBQ, fending off cotton candy and bacon-wrapped hot dog vendors, and watching the next group over dance to salsa music all night. I love this town.
It was totally worth it, though. Where else could you see such a marvelous idea for a float?
But oh no, that's not all. For New Year's Eve our friends had a "Minute to Win It" party featuring ridiculous stunts, feats of strength, tests of skill, and general daring-do. It was delightful.

But enough about how well Jason juggles balloons, let's talk about cookies! I brought these Midnight Crackles to the NYE party, where they performed poorly in the Feats of Strength category but earned high marks in the Edible and Delicious category.
To make them more festive, I topped the cookies with edible gold star confetti. (From Michael's--expensive but pretty awesome.) They just needed something to make them pop visually, something that screamed Happy New Year!
Taste-wise, they were a little less exciting. I was hoping they'd have a soft, gooey center, but they were more cake-like. The flavor was nice, but it just wasn't the texture I was hoping for--adding some chunks of chocolate might also have helped.
But they were still tasty, and they still helped us ring in the new year on a sugar high, so what more can you ask for?
Monday, December 27, 2010
Fashionably Late Buche de Noel
Merry Few-Days-After-Christmas, friends! Did you all have wonderful holidays full of eggnog and stockings and too many cookies and repeated viewings of Elf? I know I did.
I also had an awesome gift from Santa:
How great is that?! I guess he reads the blog! Sweeeet. A sassy shirt is all well and good, but next year I'm going to be dropping waaaay more hints about the VitaMix I'm currently coveting. Ahem.
But back to more important things! Like what I used all the ganache for. I'll give you a hint: it's chocolatey. I'll give you a second hint: it was seasonally appropriate, but now, two days after Christmas, it's woefully unfashionable. I'll give you a third hint: it rhymes with smoosh the po-elle.
If you guessed a buche de noel, you're right!
Most buche de noels, or yule log cakes, are made from a springy sponge or genoise cake rolled around a filling, then decorated to look like yule logs. This recipe was a bit different--and dare I say, much better--because it used a flourless chocolate cake that was more like a baked mousse in taste and texture. It was a little more finicky to work with, but the melting, creamy texture more than made up for a few more minute's work.
The cake was rolled around sweetened vanilla whipped cream, and then covered with simple ganache. I used a spatula and a fork to give it a little texture, and stole a few sprigs of rosemary from my parent's bush to decorate the plate, along with some freshly shredded coconut and fresh cranberries.
And the mushrooms. Let's not forget the meringue mushrooms! What should have been a simple accompaniment was made more interesting by the fact that I baked them on the day a big storm rolled into town, causing the meringues to get spongy and sticky. I was able to assemble about a third of them, held together with the most fervent of hope and the sharpest of toothpicks. 
The mushrooms were a wreck by the end of the night, but they held together enough for the pictures, which is the important part. Plus, they're fun to make, even when they collapse in a gooey pile.
In the end it was a huge success. We took slices that were way too big, polished them off, and licked our plates clean. And isn't that what Christmas is all about?
Fashionably late--OR AWESOMELY EARLY FOR CHRISTMAS 2011--buche de noel recipe below!
Buche de Noel
Cake recipe from Rose Levy Beranbaum's The Cake Bible
1/4 cup (50 grams) plus 2 tablespoons (28 grams) granulated white sugar
6 large eggs, separated
1/2 teaspoon pure vanilla extract
4 ounces (112 grams) bittersweet or semisweet chocolate, chopped in small pieces
3/4 teaspoon cream of tartar
Preheat oven to 350 degrees F (180 degrees C) and place the oven rack in the center of the oven. Butter, or spray with a non stick vegetable spray, a 17 x 12 inch (43x30 cm) baking pan. Line the pan with parchment paper and then butter and flour the parchment paper.
While the eggs are still cold, separate the eggs, placing the whites in one bowl and the yolks in another. Cover and bring to room temperature before using (about 30 minutes). Meanwhile melt the chocolate in a heatproof bowl placed over a saucepan of simmering water. Remove from heat and cool.
In the bowl of your electric mixer (or with a hand mixer) place the egg yolks and 1/4 cup of sugar and beat until light and fluffy (about five minutes). (When you slowly raise the beaters, the batter will fall back into the bowl in a slow ribbon.) Beat in the vanilla extract. Scrape down sides of bowl. Add the melted chocolate and beat only to combine.
In a clean mixing bowl, with the whisk attachment, beat the egg whites until foamy. Add the cream of tartar and beat at medium-high speed until soft peaks form. Gradually beat in the remaining 2 tablespoons sugar until stiff peaks form.
Gently fold a small amount of the egg whites into the egg yolk mixture using a rubber spatula or whisk. Fold in the remaining whites just until incorporated. Don't over mix or the batter will deflate. Spread the batter evenly into the prepared pan. Bake until the cake is puffed, has lost its shine, and springs back when gently pressed, about 15-17 minutes. Remove from oven and place on wire rack to cool. Cover the cake with a clean, slightly damp towel.
Whipped Cream
1 cup heavy whipping cream
1/4 cup granulated sugar
1 tsp vanilla
1/2 tsp cinnamon
Beat together all ingredients until the cream starts to hold firm peaks, but don't beat so long that it starts to curdle and have a buttery, overwhipped texture.
Ganache
12 oz good-quality semi-sweet chocolate
1.5 cups heavy cream
2 tbsp softened butter
Chop the chocolate into small pieces and place it in a large bowl. Add the butter on top. Put the cream in a saucepan over medium-high heat and heat until it simmers and bubbles appear along the sides of the pan, but do not bring it to a boil.
Pour the hot cream over the chopped chocolate and whisk it together until the chocolate melts and the mixture is shiny and smooth.
Cover with cling wrap and, ideally, let sit overnight at room temperature to firm up until it is a spoonable consistency, like peanut butter. If you don't have that much time, place it in the refrigerator and whisk it every 15 minutes until it is the texture of frosting. Do not leave it in the fridge too long, or it will get hard!
Meringue Mushrooms
Try my recipe here, or there's also a photo tutorial. Easy, yay!
Buche de Noel Assembly
Once the cake has cooled, spread it with an even layer of the whipped cream. Gently roll the cake, peeling off the parchment paper as you roll (the cake may crack).
Trim one end of the cake at an angle and set it aside. Then place the cake, seam side down, on your serving platter lined with strips of waxed paper. Take the slice of reserved cake and attach it to the top of the cake to resemble a branch growing off the log.
Gently spread the ganache over the outside of the cake. Once it's completely covered, use a spatula or a fork to create waves and texture in the ganache to resemble tree bark.
Finish the buche de noel with meringue mushrooms, powdered sugar or coconut for snow, and optional accents like leaves or chocolate shavings.
Monday, December 20, 2010
Hot Chocolate On A Stick
I have a love-hate relationship with hot chocolate.
I love that such a product exists. Chocolate! In a cup! Suitable for slurping!
I hate that it most often comes from chalky powdered mixes. Ew.
I love that hot chocolate goes with everything: marshmallows, candy canes, a nutritious veggie-packed dinner...
I hate that it is the caloric equivalent of a small meal, especially when I add those marshmallows and candy canes.
As I've grown older, the sensible part of my brain has sided with the "hates" and hot chocolate has become more and more of a rarity in my diet.
Until.
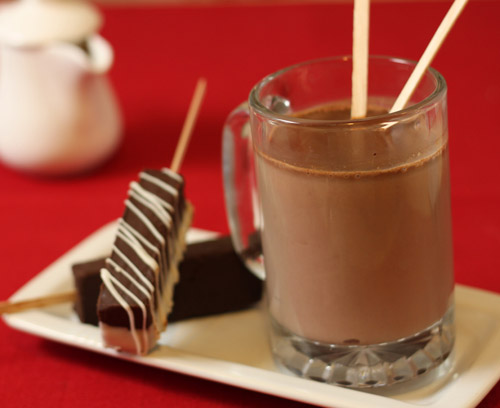
Hot Chocolate On A Stick.
The name is a bit of a misnomer. It should really be called "Super Intense Fudge Blocks That You Skewer And Oh Yeah, If You Put Them In Milk They Melt And Make Amazing Liquid Fudge."
THAT is truth in advertising.
The basic recipe is just four ingredients: cream, condensed milk, and two kinds of chocolate. They're blended together, and then once the fudge sets up, it's cut into blocks and be-sticked. Really, that's it. It's a plain and simple process that produces the best hot chocolate I've had in a long time. It's ridiculously rich, of course, but not too sweet at all, and it actually tastes like chocolate instead of defatted cocoa and hydrogenated palm kernel oil and whatever else they're shoving into those cocoa mixes these days.
The fudge is fine on its own, but I would absolutely recommend making this primarily as a hot chocolate delivery device. The fudge can be cut into squares or rectangles (or circles! or dodecahedrons!) and can be flavored with all sorts of flavoring oils. I left some plain, rolled some in crushed candy canes, and drizzled and dunked some in orange-flavored white chocolate. [PSA: do not add orange zest to white chocolate, it will seize. Stick to orange oil for flavoring. Cannot believe I did not know this before. Older and wiser, et cetera.]
Through hard experience, we can vouch that the hot chocolate is also an excellent biscotti-softening tool. I made this Christmas biscotti for the Oh Nuts blog and if I may be a huge braggart, it's a winner. It has red & green pistachios, cranberries, white chocolate, and orange zest, and it's simply begging for a hot chocolate bath. Biscotti + hot chocolate on a stick = best gift plate ever? Just sayin....
I still have a love-hate relationship with hot chocolate, however:
I love how it tastes
I hate that it's still one trillion calories
I love that I've had two mugs today
I hate that the second batch is almost gone!
Hot Chocolate On A Stick
yield: about 25 pieces
Prepare an 8x8 pan by lining it with aluminum foil and spraying the foil with nonstick cooking spray. Place the chopped semi-sweet and unsweetened chocolates in a large heat-safe bowl.
Pour the heavy cream and condensed milk into a medium saucepan and whisk until combined. Put the saucepan over medium heat. Bring the liquid to a simmer, whisking frequently so that the condensed milk does not scorch on the bottom of the pan.
Once the liquid is simmering, pour the hot cream over the chopped chocolate and let it sit for a minute to soften. Begin whisking the cream and chocolate together, until the chocolate is melted and you have a shiny, smooth mixture. It will be fairly thick.
Pour the chocolate into the prepared pan and smooth it into an even layer. Allow it to sit and firm up overnight, or for 3-4 hours in the refrigerator.
Once the fudge block is firm, use a large, sharp knife to cut it into pieces. If you do squares you get about twenty-five pieces (five rows and five columns), or you could do longer rectangles like I did. For the smoothest cuts, rinse the knife in hot water and dry it between each cut. Skewer each block with a lollipop stick.
To make hot chocolate: heat a mug of milk (water does not work well in this instance) and add a chocolate block. Allow it to sit and soften for a minute, then vigorously stir until it is dissolved. I find it's easiest to use a fork to break up the chocolate, or a mini whisk would also work well.
Store Hot Chocolate On A Stick in an airtight container for up to a week at room temperature, two weeks in the refrigerator, or up to a month in the freezer.