Monday, September 28, 2009

TWD: Caramel Crunch Tart with Nougat Ice Cream

Hello, Snickers bar disguised as a fancy tart! I mean, that's what this was, right? A crispy tart shell encased a fabulously dark caramel sauce studded with salty peanuts, topped by a rich chocolate ganache. Caramel + peanuts + chocolate = Snickery goodness. Of course, this tart was waaaay better than your common candy bar.
I decided to dress this tart up a bit by sprinkling crushed peanuts in a ring on top, and making some sugar corkscrew curls. The stars aligned and I was a sugar spinnin' rockstar, making dozens in no time flat. Usually I decide to play with sugar on the one day a year we get rain in LA, and the humidity wreaks havoc, so this was a welcome break from pattern.

I kind of couldn't stop taking pictures of the corkscrews and making "booooiiiing" noises in my head. They were mesmerizing:

You'll poke your eye out, kid!

I loved this tart because, although the flavors were familiar, almost common, it tasted very sophisticated, I think because it really wasn't very sweet. I cooked my caramel very dark so it had that smoky-verging-on-burnt taste, and I used salted peanuts instead of honey roasted to keep it sort of savory. I used a fairly dark chocolate, too, and the combination of these fillings meant that this was a very "adult" dessert.

Of course, I had to go ahead and ruin the sophistication with some ice cream! I couldn't get the Snickers comparison out of my head, so I made some nougat ice cream to complete the similarity. The real Snickers candy bars have a peanut-flavored nougat, while this one is more of a traditional Torrone-style nougat flavor. However, the sweet honey and almond flavors, and the creamy texture, were the perfect complement to the tart. Even if you've already devoured your tart, bookmark this nougat ice cream recipe--it's one of my favorites (and no ice cream maker required!)

Also, I've put together a tutorial showing how to make sugar corkscrews!

I taught myself how to make them by reading other recipes, and had some frustrations in the beginning, because I didn't realize how the sugar should look and behave when it was ready to be spun. Once I got my sugar to the right stage/temperature, it became really, really easy. So hopefully this tutorial will help by showing exactly what texture and appearance the sugar should have. I put it up on my candy site, check it out here: How to Make Sugar Corkscrews. Let me know if you guys try it out!

Read More...

Monday, September 21, 2009

TWD: Cottage Cheese Pufflets

Wow, sucks to be these Cottage Cheese Pufflets. On any other week, I'd make them and think, "Hey, those were pretty good. The dough was ridiculously soft and finnicky, and they could have been flakier, but overall they were pretty solid." However, the Pufflets (which, by the way, will be my next band name) had the unfortunate luck to follow on the heels of the Flaky Apple Turnovers, a truly excellent pastry.


Sadly, these just could not compare to the turnovers. In form they're practically identical--a tangy, slightly sweet, flaky dough folded over a fruit filling--in this case, homemade strawberry preserves. This dough had cottage cheese blended into the butter, which is something I had never heard of, and I'm cottage cheese's #1 fan. In fact, I could go for some cottage cheese pancakes right now. But pastry dough? That's a new one to me.

In contrast to the low-maintenance turnover dough, THIS dough required multiple extended chilling times, kid gloves, shiatsu massage, and a snack of peeled grapes before it would consent to being handled. And even then, I felt like I was gambling every time I touched it and tried to persuade it to enclose just one more spoonful of dough. Diva!


And after all the babying of the dough, the cookies were...good. Tasty. But certainly not worth the time and effort, when I could whip up a batch of flaky apple turnovers and have time leftover for re-watching Glee for the 100th time (yesssss!). Sorry, pufflets. Maybe next time you'll follow, like, Spam Snickerdoodles or something, and you'll be extra-tasty in comparison.

Read More...

Monday, September 14, 2009

TWD: Flaky Apple Turnovers

I just fired my husband, and these flaky apple turnovers are to blame.

See, his job to is bring mindfulness and moderation to my dessert consumption. Without his gentle reminders, I am prone to eating enormous quantities of desserts all at once and then loudly whining about how much I regret it for the rest of the day. We both quickly grew tired of this vicious cycle, so he now has the responsibility to be the voice of reason to counteract my insane sweet tooth.


A few minutes ago I wandered out into the living room, complaining that I wasn't sure what to write about these turnovers. Sure, they tasted great, were easy to make, and had a fantastic flaky crust, but I just wasn't inspired. I didn't have an angle. Our talk eventually turned from blogging to a game he was playing, and I sneakily, casually, got up and started picking at the lone remaining turnover. It looked lonely! It needed a friend! Pretty soon I'd demolished the crisp corners and moved onto the center, bursting with sweet apple filling. I gave him a few token bites, but let's be honest--this baby was mine, start to finish. And did he stop me? Did he even suggest that a turnover was not an appropriate pre-bed snack? No! FIRED.

We both think it was worth it, though. He got a few bites of apple turnover, and I got a blog post. Aside from the awkwardness of firing my own husband, it's a win-win situation.

Read More...

Sunday, September 13, 2009

Baby, You're A Rock Star Shower Cake

Something's in the water round these parts, because all of my friends are either new mothers or expecting. Downside: being (blissfully) left out of dirty diaper and breastfeeding discussions. Upside: baby showers and the desserts that go along with them! (Oh, and the resulting babies are a pretty big upside too.) This past weekend we celebrated my friend Jane and her soon-to-be-son, and I got to do the cake for the shower.

Jane is doing a rock & roll theme in her nursery, so the shower theme was ROCK-a-bye Baby, with stars and music note decorations. I decided to roll with the star theme for the tiered cake I made:
The cake is chocolate with layers of mint buttercream. The blue and white material is fondant, and the brown is chocolate plastic. The plaque is white chocolate, and the stars on top are gumpaste.

The stars were yet another example of something that seems awesome in my head, but could use a dress rehearsal before I attempt it on a cake. The wire I had wasn't the right thickness to support the stars like I wanted, and they kept spinning around in ways that aggravated the OCD side of me that wanted them just to stay put. I don't know that gumpaste was the right choice--next time I might try fondant, and definitely use a sturdier gauge of wire.

The woman of the hour, the cake, and yours truly, right before we cut it. I'm bummed that this picture is blurry, but it's too cute not to post.

And the inside, with a blue buttercream layer just for fun:


Speaking of baby shower cakes, one of the first large cakes I made (and one of my first posts on this blog!) was a baby shower cake about 3 years ago. It's funny--and surreal--to look back on it now and see how much I've learned and grown as a baker and a blogger during this time, and of course it's even crazier to think about the baby from that shower, who is now a full-on walking, talking little person. Time flies, and I'm so grateful to have these occasions to help us celebrate milestones.

Read More...

Tuesday, September 08, 2009

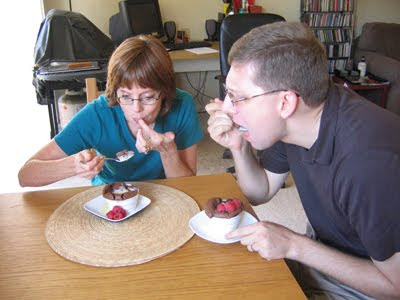
Tuesdays with Mommie II: Chocolate Souffles

Guess who's back baking with me?!
I'll give you a hint: you may know her from such baking adventures as Tuesdays with Mommie: Linzer Sables. Yes, it's my ma! She's here visiting us for a few days, and she brought our signature baking move with her:
Seriously, how fun is it to bake with friends and family? (So fun!) She had never made a souffle before so this week's TWD pick was perfect. We got to try something new together, have fun in the kitchen, and eat gobs of chocolate before, during, and after the process.

I'm not going to lie, though, the afternoon had its stressful moments. The egg whites were a little overbeaten, and the ramekins I have were not straight-sided. After we put our babies in the oven, we were overcome with worry. Would they rise? Would they maintain their shape? Fingers crossed!

And the answer is, yes, they rose, and um, they sort of retained their shape. They had some round puffiness going on, but I like to think this just adds to their homemade charm.
The best part, though, was the creme anglaise we made to go with the souffle. I had some fresh mint, so I infused a plain anglaise recipe with fresh mint leaves for several hours, and it gave it the most wonderful minty, refreshing, floral fragrance. It was nothing like mint extract, it was so fresh and herbal. It was the perfect way to cut down on the richness of the souffle. I also served it with fresh raspberries, which is one of my favorite herbal mint accompaniments.

All in all, it was a big success and a great afternoon spent in the kitchen. This recipe isn't my favorite chocolate souffle recipe (that honor goes to this beauty from Epicurious) but it still tasted great in my opinion. And what did everyone else think? I tried to ask, but their mouths were too full of souffle to answer!


For the chocolate souffle recipe, head on over to Susan's blog at She's Becoming DoughMessTic. The fresh mint creme anglaise recipe is after the cut.


Fresh Mint Creme Anglaise
Makes about 1 cup, enough to serve with 3-4 mini souffles

1/2 cup whole milk
1/2 cup cream
4-5 large mint leaves
3 large egg yolks
1/4 cup sugar

Place the milk and the cream in a small saucepan over medium heat, and bring to a simmer. Remove from the heat, and chop or tear the mint leaves. Place the torn leaves in the milk and put a lid on the pot to infuse the flavor, let it set for at least 30 minutes. (Mine sat for more like 2 hours).

Once you're ready to proceed, strain the leaves from the milk and place the pan back on medium heat. Put the yolks in a medium bowl and whisk them, then add the sugar and whisk to combine. When the milk is at a simmer, slowly pour it into the yolks, whisking the whole time, then return the mixture to the saucepan. Cook the custard over medium heat, stirring constantly, until it reaches 175 degrees on a thermometer. Remove it from the heat, pour it through a strainer into a bowl or tupperware, and press clingwrap to the top to prevent a skin from forming. Chill for several hours before use.

Can also be churned into really delicious fresh mint ice cream!

Read More...

Tuesday, September 01, 2009

Dulce de Leche Brownies (and more!)

This week's TWD recipe was an espresso-cheesecake brownie, which sounds fabulous...if you like espresso. Or cheesecake. Unfortunately, neither of those elements are too popular around my house. BROWNIES, on the other hand, will earn you fawning compliments, a kiss, and a folded twenty slipped into your palm, easy. So instead of the given recipe, I decided to make a recipe I've been dying to try: David Lebovitz's Dulce de Leche Brownies.

My husband loves dulce de leche. Looooves it. Busts out a spoon and hovers protectively over the dulce de leche and snaps like a chihuahua at anyone trying to get near it-style love. So knowing this, you'd think I would make it a point to work dulce de leche into our dessert rotation on a regular basis, but no. It just doesn't usually occur to me to make a batch and then use it for baking. However, now that we've had these brownies, we may start seeing a lot more of it around these parts.

I made the dulce de leche the old-fashioned way: boiling a can on the stovetop for about 5 hours. Some folks have a problem with this, to which I say, feh! If you let a little thing like exploding cans and grievous bodily harm worry you, you have no place in my kitchen. NO FEAR, SUCKAS. Buuuut I suppose if you're really going to wuss out, you can make it using other methods, like in a pressure cooker, crock-pot, or out of the can and baked in a water bath in the oven. (Weenies.) At any rate, once you have the gorgeously thick dulce de leche, you'll want to eat a bunch of it on its own, until you start to vibrate from all of the sugar in your system. At that point, you're ready to use the rest to make these brownies!

The brownies turn out rich and somewhat fudgy, although the 3 eggs in the recipe prevent them from being too dense or gluey. The dulce de leche is swirled throughout the batter but I tried to leave some in pockets so the flavor wouldn't be lost, and it worked well--most bites had at least a little dulce de leche, and some had big gobs of the caramelized goodness. DELICIOUS. These were pretty intense, so they can be cut into fairly small squares, and I found a pan stretched pretty far.

I also made these wonderful candies with some of the dulce de leche. They're super-simple but incredibly addicting! I took two jumbo pecan halves and sandwiched them with a small spoonful of dulce de leche. Then the whole package was dipped in dark chocolate. It was such a great combo--crunchy toasted nuts, rich chocolate, and creamy, caramelized dulce de leche. They're a perfect one or two-bite candy, almost too easy to munch, if you know what I mean. You don't really need a recipe but if you'd like one it can be found here: Dulce de Leche Pecan Bites.


The recipe for the brownies can be found after the cut...


Dulce de Leche Brownies from the ever-fabulous David Lebovitz
Yield: 12 brownies

8 tablespoons (115g) salted or unsalted butter, cut into pieces
6 ounces (170g) bittersweet or semisweet chocolate, finely chopped
1/4 cup (25g) unsweetened Dutch-process cocoa powder
3 large eggs
1 cup (200g) sugar
1 teaspoon vanilla extract
1 cup (140g) flour
optional: 1 cup (100 g) toasted pecans or walnuts, coarsely chopped
1 cup Dulce de Leche (or Cajeta)

Preheat the oven to 350 degrees (175 C).

Line a 8-inch (20 cm) square pan with a long sheet of aluminum foil that covers the bottom and reaches up the sides. If it doesn't reach all the way up and over all four sides, cross another sheet of foil over it, making a large cross with edges that overhang the sides. Grease the bottom and sides of the foil with a bit of butter or non-stick spray.

Melt the butter in a medium saucepan. Add the chocolate pieces and stir constantly over very low heat until the chocolate is melted. Remove from heat and whisk in the cocoa powder until smooth. Add in the eggs one at a time, then stir in the sugar, vanilla, then the flour. Mix in the nuts, if using.

Scrape half of the batter into the prepared pan. Here comes the fun part.
Drop one-third of the Dulce de Leche, evenly spaced, over the brownie batter, then drag a knife through to swirl it slightly. Spread the remaining brownie batter over, then drop spoonfuls of the remaining Dulce de Leche in dollops over the top of the brownie batter. Use a knife to swirl the Dulce de Leche slightly.

Bake for 35 to 45 minutes. The brownies are done when the center feels just-slightly firm. Remove from the oven and cool completely.

Read More...