Tuesday, May 24, 2011

TWD: Oatmeal Nutmeg Scones

Good evening, ladies and gentlemen. I am pleased to present a very special Poetry Edition of Tuesdays with Dorie.

*polite applause*


There once was a food called a scone
With oatmeal and nutmeg alone
In looks it was simple
Bumps, crags, and a-dimpled
But the taste could make a man moan!


These scones were a treat eaten plain
We enjoyed them again and again
But we liked them the best
When with jam they were dressed
Not to gorge ourselves was a real strain.


So we come to the end of the post
And I truly don't mean to boast
The scones were quite good
For a non-dessert food
Thanks to Patricia, our host!

Read More...

Tuesday, May 10, 2011

TWD: Brown Sugar Bundt Cake

Back in my pre-blogging days, when I was a young idealistic lass, I thought that when I had a food blog, I would bake yummy foods and take pictures of them and write about how yummy they were. My eyes sparkled with naivete and hope.


Ah, foolish youth.

Instead, what I mainly write about is bundt cakes, and my lack of success with unmolding them. Seriously.

It's kind of a problem.

I got a new bundt pan and the past few attempts have gone swimmingly. I was confident--cocky, even!--that my days of bad bundts were behind me. Smoooooth sailing ahead. You see where this is going?


Weeping. Wailing. Gnashing of teeth.

Honestly, I'm not so young anymore. I don't know that I can take the heartbreak and the emotional rollercoaster of baking bundt cakes. It's exhausting. I'm happy--the batter tastes good! The bundt cake looks beautiful! What could possibly go wrong?! And then--DISASTER. Someone cover this cracked mess with powdered sugar, stat.


I am willing to accept some blame. Maybe the cake was a little underbaked, maybe I should have waited a little longer to unmold it. Perhaps. But maybe it's just a sign from the universe that I should never, no never, no NEVER make bundt cakes again.

Word.


Well, this was a pretty good cake to go out on. I nixed the fruit options and instead used ground pecans in the batter, and added mini chocolate chips and toasted pecan chunks as mix-ins. It was nice and moist, although perhaps I should have kept in some fruit for a bit more texture. But it makes a nice, low-key tea cake, assuming you don't have a conniption fit upon trying to unmold it like I did.

Want to try your luck at bundt roulette and make this cake? Peggy has the recipe and some lovely pictures over at her blog, Pantry Revistited.

Read More...

Tuesday, May 03, 2011

TWD: Chocolate-Orange Marbled Loaf Cake

Ahhh it feels good to be back in the warm embrace of Tuesdays with Dorie. I've taken more than a few weeks off lately, and although it was necessary, it's so nice to be back in a routine, blogging with some of my favorite people!


Fun fact: this week's recipe, a Marbled Loaf Cake, looks an awful lot like my first TWD post ever, for Black & White Banana Loaf! I remember that bread being a-mazing, although I do think the pictures have improved around here since then...

I flavored half of the batter chocolate, and added orange oil and orange zest to the other half, to make a subtly scented orange-chocolate loaf. Haters gonna hate, but I'll always love the orange-chocolate combo.

I had too much batter for my loaf pan, so with the extra I made the sweetest little 3" mini loaf. It was actually better than the full-sized one (didn't get as brown and crusty on top) and I wish I'd baked all mini loaves. The tiny tin is from Sur la Table.

This is a soft, fine-crumbed cake that seems perfect for afternoon tea, or a light dessert with maybe a touch of lightly whipped cream and some berries on top. You can find the recipe at Carol's blog, The Bake More.

Thanks also for the well-wishes about my big race last weekend! It was kind of epic. There were high highs and low lows, but overall it was wonderful and I finished feeling great, even though I couldn't stomach all of the chia I'd packed. By the end, I just wanted brownies and Coke. (Which, PS, is a very bad combination. Learn from my mistakes.)


Read More...

Friday, April 29, 2011

Double Coconut Macaroons and Chia Gel

If I were to ask you what coconut macaroons and chia gel had in common, you might think it was a trick question. (You might actually think I was making up the concept of "chia gel" entirely, but I assure you--it's a thing. And only tangentially related to the chia pet.)

Yes, they're both two-word phrases, and yes, they both contain vowels. But beyond that, they're both goodies that I made yesterday to carry me through my first 50-mile run of the season, happening bright and early tomorrow morning. (!!!)

I'll ease you in gently with the macaroons.


I'm definitely a solid food girl when it comes to long-distance running. My stomach can't really handle energy drinks or gels in large quantities, but I can usually eat food without a problem. I enjoy my fair share of gummy bears and peanut M&Ms, but I try to stick to reasonably healthy foods for the most part--PB&Js, potatoes, bananas, etc. I prefer to make my own sweet treats as opposed to eating the ready-made stuff, because I know exactly what goes in them and I can try to make them healthy-ish (while making sure they still contain plenty of chocolate!)


I made a batch of mini Double Coconut Macaroons for my race. Instead of the usual sugar + butter + egg whites holding the coconut together, they get their goo factor from homemade coconut butter (basically just ground coconut) and maple syrup. They have the crisp outer shell and moist interior of the best sorts of macaroons, but with some healthier ingredients. I also added vanilla extract, almond extract, cinnamon, and of course, mini dark chocolate chunks. Put these puppies in a little baggie, and I'm ready to rock the trails!

Now let's talk ch-ch-ch-chia.


Chia seeds are native to Mexico and Central America and have been eaten as part of the native diets there for centuries, but it's only in the last few years that they've become the newest trendy "superfood." You can read more about their health benefits from this CNN article, but the short story is that they have lots of fiber, antioxidants, protein, and good fats. I first tried them a few years ago, but at the time I tried adding them to oatmeal and yogurt and wasn't very impressed. It's only in the last year that I've started making a chia gel to eat on my runs, and I've really grown to love it.

But I'm not going to lie, chia gel is weird. It starts out like this: a bowl of water, some supplements and flavoring, and the dry seeds.


Give it a little whisky-whisk, let it sit out for a few minutes, and you end up with this:


The soluble fiber in the seeds causes them to absorb the liquid and soften, and instead of crunchy little seeds you end up with something more gelatinous. I don't even know how to describe it, but they each have sort of a liquid force-field (gummy sack? goopy pouch?) around them:


I portion my gel out into little baggies, and suck one down about once an hour or so. Because it contains so much water it helps with nutrition and hydration, and provides lots of energy that seems to release over time, as opposed to the spike and crash of traditional energy gels and drinks.


Food is made, gear is packed, pre-race carbo loading is in full effect...I think I'm ready! Hope you all have fabulous weekends, and if you get a hankerin' for macaroons or chia gel, recipes are below.


Double Coconut Macaroons
Adapted from Oh She Glows

2 2/3 cups shredded unsweetened coconut (to make coconut butter)
2 (additional) cups shredded unsweetened coconut
3/4 cup pure maple syrup
1 vanilla bean
1 tsp. vanilla extract
1/2 tsp. pure almond extract
1/2 tsp. kosher salt
1 tsp cinnamon
1/2 cup mini dark chocolate chunks or chips (I like the Whole Foods store brand--very dark and flavorful!)

1. Preheat the oven to 300F and line a baking sheet with a non-stick mat or parchment. In a food processor, process 2 and 2/3 cups of shredded coconut for about 5-8 minutes until coconut butter forms. You will have to keep scraping down the sides of the bowl. For a coconut butter how-to, see this post. Alternatively, you can use 1 cup of store bought coconut butter.

2. Once you have made the coconut butter, mix all ingredients together in a bowl.

3. Scoop about 1-2 tbsp of dough onto a baking sheet. You don’t have to leave much room in between as they do not spread out. Bake for 20-28 minutes at 300F. I made minis so mine were done closer to 20 minutes, if you make standard-sized cookies they might take longer. Watch them closely after 22-23 minutes. They're done when they're golden around the edges.

4. Allow the macaroons to sit for 25 minutes so they can firm up. If you do not do this, the macaroons will crumble, so this step is crucial! Store in the fridge for up to 5 days in a sealed container. Makes about 22 large or 40-50 small macaroons.

Chia Gel
yield: 2 cups

Note: Chia seeds can be easily ordered online from many different websites. Amazon carries them, and I've gotten them for cheap on ebay before. They're also in many health food stores and my local Whole Foods has them in the bulk bin section.

2 cups water
2 tbsp powdered maca (optional, this is another "superfood" made from a root native to the Andes)
Electrolytes (optional, I use Nuun tablets or you could just add your favorite sports drink powder to the water)
Any other flavorings (sometimes I add lemon/lime zest, or even Crystal Light)
1/3 cup chia seeds

Whisk all ingredients together, and let them sit at room temperature until the chia seeds absorb some water and you have a gel. You can add up to 1/2 cup of seeds if you prefer a stiffer gel--mine is slurpable consistency. Portion it out into bags, or gel flasks, or whatever is easiest for you to carry around. I've had it last at least a week, but I can't say with any authority how long it's meant to last. Enjoy!

Read More...

Tuesday, April 19, 2011

Easter Parade: Easter Egg Candies & More

Stick a fork in me, I am done.

Or, for a more Easter-appropriate figure of speech, hard-boil me and dye me. Okay, that one is weird.

Belabored metaphors aside, it's been a long couple of weeks months in the kitchen. I do love the holidays but I am so excited for a break from intensive candy-making/recipe development. Never have I been so glad there is no such thing as "Mother's Day candy recipes." With the end of the big candy holidays I am looking forward to a little more free time to cook for myself, get this blog up and running again, and--best of all!--launch a huge blog redesign. And not a second too soon. This place is a little dusty.

So dusty, in fact, I have a bunch of old photos that never made it into blog posts. These were last week's absolutely delicious strawberry-rhubarb double crisps. Sweet, tangy, with a brown sugar crumble studded with candied ginger, they were seriously good. Too bad they're old news!


You know what's not old news? Passover and Easter goodies! Here are a few things I've made lately that are floating around the internet. Maybe you'll find something to enjoy for your April holiday of choice!

Matzo Toffee for Passover: Photo Recipe


Coconut-Almond Macaroons for Passover: Photo Recipe


Easter Basket Cookies: Photo Recipe


Easter Egg Cake Pops: Recipe, Photo Tutorial


Marshmallow Chicks: Recipe, Photo Tutorial


Easter Bunny Truffles: Recipe, Photo Tutorial


Easter Basket Candies: Recipe, Photo Tutorial


Panoramic Sugar Easter Egg: Recipe, Photo Tutorial


Happy Passover! Happy Easter! Happy Eight-Hours-Of-Sleep-A-Night!

Read More...

Tuesday, April 05, 2011

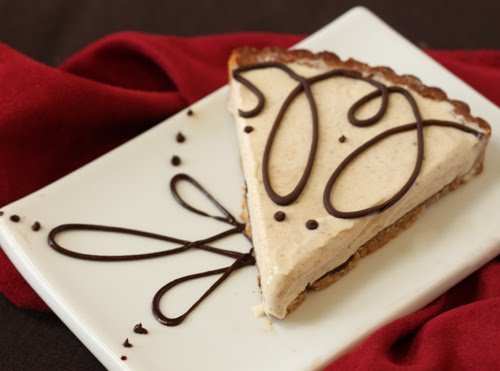
TWD: Cinnamon Ice Cream Tart

This week's TWD recipe, for a Coffee Ice Cream Tart, can be divided into two categories: things I did differently, and things I wish I'd done differently.

In the "Things I Did Differently" camp, we have the ice cream itself. Instead of doctoring up store-bought coffee ice cream with ground almonds (??) I made my very favorite recipe for cinnamon ice cream (found below). The ice cream is delicious. I have no regrets. You can keep your ground almonds!


In the "Things I Wish I'd Done Differently" category, we have...the rest of the tart. Sorry to say, the ice cream was totally the best part of this for me. The crust was way too hard, the almond flavor was too strong, and the layer of melted chocolate between the crust and the ice cream nearly shattered a molar. I was left gnawing on my crust like a crazed rodent. Not a good look.


On the bright side, I got to play around with piping some ganache on top, and I also had some candied flowers lying around (yes, I know my life is ridiculous) so I primped the tart for a little photo shoot. "You look maaaahvelous, dahling!" (Candied Flowers photo tutorial here.)


So, I'm not in love, but I can't be mad because any recipe that gives me an excuse to make cinnamon ice cream--and then lick said ice cream from inedible tart crust--is okay in my book.


For the original recipe, visit Jessica's blog, Domestic Deep Thoughts. If I were to make this again, I'd take a cue from Katrina of Baking and Boys! and make a chocolate cookie crust instead. She's a genius, that one.


Cinnamon Ice Cream

1 1/2 cups half-and-half
1 vanilla bean pod, split in two
1 cinnamon stick
1 cup white sugar
2 eggs, beaten
1 cup heavy cream
1 teaspoon vanilla extract
2 teaspoons ground cinnamon

Place the half-and-half, vanilla bean pod, and cinnamon stick in a medium saucepan over medium-high heat. Once the half-and-half comes to a simmer, take the pan off the heat, cover it with a lid, and let it infuse for at least 30 minutes and up to two hours.

When you're ready to proceed, return the pan to medium heat, remove the lid, and whisk in the sugar. When the mixture begins to simmer, remove from heat, and whisk half of the mixture into the eggs. Whisk quickly so that the eggs do not scramble.

Pour the egg mixture back into the saucepan, and cook until it reaches 175 degrees F on a candy thermometer, or until the mixture is thick enough to coat the back of a metal spoon.

Remove from the heat and pour it through a strainer into a large bowl. This will strain out the vanilla pod, cinnamon stick, and any bits of egg that might have cooked. Whisk in the heavy cream, then add the vanilla extract and cinnamon. Press a layer of cling wrap directly on top and cool in the refrigerator until completely cold.

Pour cooled mixture into an ice cream maker, and freeze according to the manufacturer's instructions.

Want to make chocolate bowls like in the photo? Chocolate bowls photo tutorial here.

Read More...

Tuesday, March 29, 2011

Oh Yes I Did: Cinnamon Roll Sugar Cookies

Two words: sugar cookies.

Two more words: cinnamon rolls.

One question: can they be combined?


Oh, yeahhhhh.


This recipe-slash-BEST-IDEA-EVER comes courtesy of Jenny at Picky Palate. The second I saw it I bookmarked the page and returned regularly to drool, plan, and plot my way into making these cookies.


The idea couldn't be simpler. Take some sugar cookie dough and roll it out into a thin-ish sheet. (Mine worked best when it was about 1/4-inch thick.) Spread on some softened butter--I'm sorry, but it must be done--and then sprinkle liberally with brown sugar and cinnamon. Treat these babies like the cinnamon rolls they aspire to be!

Roll the dough, slice it into thick rounds, then bake it up. The cookies blossom into soft, sweet rounds with crisp edges and moist middles, with a buttery cinnamon swirl threaded throughout.


And did I mention the finishing touch? A drizzle of cream cheese icing, with a touch of vanilla or lemon, to complete the resemblance to cinnamon rolls, no yeast dough required.


I made these with leftover sugar cookie dough, and it's just about the best use for leftover dough I can imagine. The dough was fairly stiff and meant to be used to make precise cutout cookies. I suspect a soft dough that makes those pillowy round sugar cookies would work even better. If you'd like a recipe for the sugar cookies themselves, I'll refer you to the source at Picky Palate for further enlightenment.

Read More...

Monday, March 21, 2011

TWD: Honey-Nut Brownies

Things You Should Know About Honey-Nut Brownies

1. They sound like a delicious breakfast cereal
2. They look and taste more like a honey cake than a chocolate brownie
3. They are much improved by a thick layer of fudgy chocolate-sour cream frosting
4. There is nothing in the world that is not much improved by a thick layer of fudgy chocolate-sour cream frosting


I think the big problem with these "brownies" was a branding issue. Calling something brownies leads to the expectation of chocolatey delight, whereas these were more of a honey explosion with faint chocolate undertones. Which is not bad, if you enjoy honey cake. Which I...sort of do.


In an effort to boost the chocolate flavor, I used only unsweetened chocolate and increased it by 2 oz (50%!). It was only semi-successful, though, and the cake still had a very strong honey flavor. So I brought out the big guns: a thick, fudgy chocolate sour cream frosting, which helped increase the chocolate taste and counteract the overwhelming sweetness. Top it with a pinch of flaky sea salt, and you have a lovely, complex cake that's none too sweet and perfectly moist and rich!


In the end I'd say it was a fairly successful chocolateish cake, but probably not one I'd repeat on a regular basis, unless it was for a honey lover of the exceptional variety. If you are such a person, the original recipe can be found on the Suzy Homemaker blog.

If you are only here for the chocolate sour cream frosting (and who could blame you?) here goes:

10 oz semi- or bitter-sweet chocolate (chocolate chips will do in a pinch, use better chocolate if you have it)
1 cup full-fat sour cream, at room temperature
1 tsp vanilla extract

Melt the chocolate in the microwave or over a double boiler, and stir until smooth.

Whisk in the sour cream and the vanilla until you have a thick frosting.

Pour immediately over cake in pan and smooth into an even layer. Let set at room temperature or refrigerate to speed up the process-frosting gets very thick in the refrigerator.

Makes enough to frost the top of a 9x13 sheet cake.

Read More...

Thursday, March 17, 2011

Marzipan Brownie Tart

Happy St. Patrick's Day! To celebrate, we had this festive dessert:


Okay, so it doesn't look very festive from the outside. Actually, it looks downright plain. Homely. FRUMPY. There, I said it. But it has a surprise inside...


A bright green layer of homemade pistachio marzipan!

...Wait, come back.

What scared you? Was it the green color, or the word "marzipan"? Because I promise, this has no relation to the poisonously powerful almond flavor and uber-sweetness of some aggressive marzipans. No, this is just a simple nut paste made from ground pistachios, powdered sugar, and a little egg. Really. It's amazingly tasty, like eating fresh pistachios with a spoon. Deep breaths. Okay.

So paired with this marzi pistachio stuff is a chocolate dough that's half brownie, half chocolate tart dough. It's weird, and I was sure I was doing it wrong the whole time I was making it. But it turned out to be perfect--soft enough to meld with the pistachio stuff, but firm enough to hold its shape when removed from the tart pan.


To finish off our green treat, I made my favorite pistachio ice cream and a simple chocolate sauce. Although the tart is moist, it needs something--ice cream, or whipped cream, or maybe creme anglaise--to perk it up. Many, many thanks to Mary Mary Culinary for the tart recipe & inspiration! Find the recipe for the tart, the "pistachio stuff," and the ice cream after the jump.


Marzipan Brownie Tart
Adapted from Mary Mary Culinary

9 oz/1⅓ cups all-purpose flour*
⅓ cup Dutch-process cocoa
½ teaspoon baking powder
¼ teaspoon salt
7 oz/1 cup brown sugar
6 oz/¾ cup unsalted butter, chilled and cubed
1 egg, well beaten

Filling
10½ oz pistachio marzipan (see below)
about ½-¾ of a beaten egg (reserve the rest for glazing)

1. Combine flour, cocoa, baking powder, salt and sugar in a food processor and pulse to combine. Add the butter and pulse until it resembles breadcrumbs. Add the beaten egg and run the food processor until the dough comes together. Try not to eat all the dough. Divide the dough into ⅓ and ⅔ portions, shape in discs, wrap separately in plastic and refrigerate. Chill for one hour. It can be made the day before, but will need to warm up before rolling to prevent it from breaking up.
2. Preheat oven to 340℉/170℃ and grease a 9" cake pan, or a 13"x4" tart pan.
3. Mix the pistachio paste with enough beaten egg to make a fairly soft, spreadable filling. Set aside. Roll out the larger portion of dough between 2 pieces of plastic wrap until it is about 1" larger than your pan on all sides. Make sure there are no creases in the plastic wrap. Use this piece of dough to line the pan, pressing it to the sides of the pan so it doesn't fall inward. Spread the pistachio paste evenly over the dough and fold in the dough edges so they rest on it. Reuse the plastic wrap to roll the smaller piece of dough into an 8½" circle. It should be slightly smaller than the cake pan. Trim it so the edges are neat. Moisten the edges of the dough in the pan and lay the smaller circle on top. Press the edges gently together to seal. Brush with the leftover beaten egg and prick with a fork in several places.
4. Bake for 30-35 minutes. Leave to cool in the pan, then transfer carefully to a serving plate. If you can stand it, wrap this and let it sit for a day or two before serving for best flavor.

*a note about the flour: something is off in these measurements. It calls for 1-1/3 cup/ 9 oz, but 9 oz is much closer to 2 cups. I went with the volume measurement and had a dough that was pretty stick and a bit of a beast to roll out. It worked out fine in the end, and tasted great, but I might add more flour next time to make it easier to work with. If you have a scale, I'd just use 9 oz, and if you don't, I'd try 1-3/4 cup flour instead.

Pistachio marzipan
10 ounces/283 grams shelled pistachios
7 ounces/200 grams granulated sugar
2 egg whites

1. If you want naturally bright green marzipan, first blanch the pistachios: bring a large pot of water to a boil, add pistachios and blanch for 30 seconds to one minute. Test one by running it under cold water and seeing if the reddish skin comes off easily. If so, drain and rinse with cold water. Now, one by one, squeeze the pistachios to remove the skin. This is what keeps the marzipan bright green. Once they are all skinned, place on a towel-lined baking tray and allow to dry for at least 3 hours. Do not dry in the oven, as the color may fade.
2. Combine pistachios and sugar in a food processor and grind as finely as desired.
3. Add egg whites and process until well blended. If you didn't blanch the pistachios and the marzipan is a little brown, you can add a drop or two of green food coloring. Scrape into a container and refrigerate or freeze. This keeps well, and is best made in advance.

Pistachio Ice Cream

yield: About 3 cups

1 cup unsalted shelled pistachios
3/4 cup sugar
2 cups milk (do not use low-fat or nonfat)
1/2 teaspoon almond extract
4 large egg yolks
1 cup whipping cream
3/4 cup unsalted shelled pistachios, toasted, coarsely chopped

Finely grind 1 cup pistachios and 1/4 cup sugar in processor. Bring milk and ground pistachio mixture to boil in heavy large saucepan. Remove from heat. Mix in almond extract.
Whisk egg yolks and remaining 1/2 cup sugar in medium bowl. Gradually whisk in hot milk mixture. Return custard to saucepan. Cook over low heat until custard thickens and leaves path on back of spoon when finger is drawn across, stirring constantly, about 10 minutes (do not boil). Strain into large bowl. Chill until cold, about 2 hours.
Stir 1 cup whipping cream and chopped pistachios into custard. Process mixture in ice cream maker according to manufacturer's instructions.

Read More...

Monday, March 14, 2011

TWD: Citrus Cranberry Sunshine Muffins

Citrus sunshine muffins, you say? I've got your sunshine right here:


Well, okay, that's not so impressive. But you have to believe me that it's been very sunny and downright hot here the past few days! The perfect weather to pair with these bright and cheery muffins:

I am permanently done with currants since my stint living in England, land o' the currants and custard, so I substituted cranberries in their stead. I used the zest of two oranges and a lemon and although I thought for sure it would result in overwhelming zestiness and general awesomeness, the citrus flavor was still not bold enough for me! Next time I'm chucking in a whole grapefruit and that'll be the end of it.

I also thought these muffins could use some sexy accessorizing--maybe a little drizzle here, or a streusel topping there? Nothing crazy, but a little something to perk them up. As they were, their flat top and coarse crumb will never get them asked to the homecoming dance. But add a little lippy, lose the glasses, and bam--I've just improved these muffins and told you the plot to She's All That in one short paragraph.

One last thing--I just have to point out that cute bowl holding the muffins. You can't see it very well in most of the pics, but it's actually a bunny bowl! They were a graduation gift from my aunt, and I think they're just the cutest thing since post-makeover Rachel Leigh Cook in She's All That. Unfortunately they fall into the category of "so lovely I'm afraid to use them every day so I'll put them somewhere safe" so they don't get used as much as I'd like. Until now. Ta-daaa.

Want the recipe? Head over to Lauryn's blog, Bella Baker, to get it--she also has a $40 CSN giveaway going on right now, if free stuff is your thing. No word on whether CSN stocks bunny bowls.

Read More...