My Google Reader was a thing of beauty this morning: dozens of new posts from my favorite food blogs, bursting with delicious Nutella recipes in honor of World Nutella Day. It's the most wonderful time of the year...
I've already featured two different types of homemade nutella, and four-ingredient Nutella cupcakes, but trust me when I tell you, I've saved the best for last.
Nutella Semifreddo is perhaps the best thing I've eaten so far this year. This may not seem like an earth-shattering statement, but in the last month I've created 16 new recipes for the candy site, made multiple baked goods for this here blog, and eaten my way through the patisseries of Boston and New York.
(Also, I have vowed to start eating well aaaaaaany day now...just as soon as I find a diet that endorses Nutella and full-fat cheese.)
Semifreddo, if you're not familiar with it, is an Italian word that means "half-frozen" and it can refer to any number of desserts, most of them in the sorbet/frozen mousse/ice cream tart category. This Nutella Semifreddo is perhaps most similar in taste and texture to a frozen mousse. Slightly warm and liquid Nutella is stirred into well-beaten eggs, then soft whipped cream is folded into this mixture to lighten the texture and round out the flavor. The final touch is stirring in shaved dark chocolate and chopped toasted pistachios, for pockets of bittersweet crunch sprinkled throughout.
This semifreddo can be made in a loafpan and served in slices (easy way) or spooned into individual glasses or serving dishes (bonus credit). I liked it best after it had sat out of the freezer for about five minutes. The edges start to soften, the way good ice cream gets melty along the edges, but the rest of the dessert holds its body when you put it in your mouth, silky-smooth and lighter than air, where it ever so gently melts with your body heat until all that's left is the taste of chocolate and hazelnuts coating your tongue.
If you like mousse, you'll love semifreddo.
If you like ice cream, you'll love semifreddo.
If you like Nutella, you'll love semifreddo.
If you don't like any of these, you've probably come to my blog by mistake because you meant to type Death of Cake but got Cake or Death instead. I'm sorry. It happens. Perhaps some semifreddo will make you feel better.
Chocolate Nutella Semifreddo
Adapted from More Than Burnt Toast
4 large eggs, room temperature
1/4 cup granulated sugar
1 13 ounce (400 gram) jar Nutella
1 cup heavy cream
1 tablespoon chocolate or hazelnut liqueur, or vanilla extract
4 oz. bittersweet chocolate, shaved
2/3 cup roasted pistachio nuts, coarsely chopped
Chocolate curls, for decoration
*****************
Line a mold of your choice with plastic wrap, taking care to leave about a 3 inch length hanging over the edge. I recommend a loaf pan about 8x4, or you can use individual serving cups and not worry about the plastic lining.
Gently whip the cream until it holds soft peaks. Be careful not to overwhip and cause the cream to break or become grainy.
Heat the Nutella in the microwave for about 20-25 seconds to soften it up. Set aside.
Place eggs and sugar in the bowl of an electric mixer. Place mixing bowl over a pot of simmering water and whisk until the eggs are warm, about 2 minutes.
Place the bowl in a stand mixer. Using the whisk attachment, whip the eggs on high speed until pale and tripled in volume, about 5 minutes.
Add the softened Nutella and the chocolate or hazelnut liqueur, or the vanilla extract, to the egg mixture and mix on low speed until blended.
Gently fold in the whipped cream, half of the shaved chocolate and 1/2 cup of the chopped nuts.
Scrape mixture into the mold and spread evenly, or spoon into the individual serving cups. Top with the remaining shaved chocolate. Cover the top of mold with plastic wrap and freeze for at least 8 hours or overnight.
When you are ready to serve, unmold the semifreddo and flip it upside-down. Cut it into slices and top them with a few curls of chocolate and the remaining chopped nuts. Like ice cream, this would be bonkers with a warm chocolate (or chocolate-hazelnut?) sauce and/or whipped cream. But it's pretty epic just the way it is.
Saturday, February 05, 2011
Nutella Semifreddo for World Nutella Day
Monday, December 27, 2010
Fashionably Late Buche de Noel
Merry Few-Days-After-Christmas, friends! Did you all have wonderful holidays full of eggnog and stockings and too many cookies and repeated viewings of Elf? I know I did.
I also had an awesome gift from Santa:
How great is that?! I guess he reads the blog! Sweeeet. A sassy shirt is all well and good, but next year I'm going to be dropping waaaay more hints about the VitaMix I'm currently coveting. Ahem.
But back to more important things! Like what I used all the ganache for. I'll give you a hint: it's chocolatey. I'll give you a second hint: it was seasonally appropriate, but now, two days after Christmas, it's woefully unfashionable. I'll give you a third hint: it rhymes with smoosh the po-elle.
If you guessed a buche de noel, you're right!
Most buche de noels, or yule log cakes, are made from a springy sponge or genoise cake rolled around a filling, then decorated to look like yule logs. This recipe was a bit different--and dare I say, much better--because it used a flourless chocolate cake that was more like a baked mousse in taste and texture. It was a little more finicky to work with, but the melting, creamy texture more than made up for a few more minute's work.
The cake was rolled around sweetened vanilla whipped cream, and then covered with simple ganache. I used a spatula and a fork to give it a little texture, and stole a few sprigs of rosemary from my parent's bush to decorate the plate, along with some freshly shredded coconut and fresh cranberries.
And the mushrooms. Let's not forget the meringue mushrooms! What should have been a simple accompaniment was made more interesting by the fact that I baked them on the day a big storm rolled into town, causing the meringues to get spongy and sticky. I was able to assemble about a third of them, held together with the most fervent of hope and the sharpest of toothpicks. 
The mushrooms were a wreck by the end of the night, but they held together enough for the pictures, which is the important part. Plus, they're fun to make, even when they collapse in a gooey pile.
In the end it was a huge success. We took slices that were way too big, polished them off, and licked our plates clean. And isn't that what Christmas is all about?
Fashionably late--OR AWESOMELY EARLY FOR CHRISTMAS 2011--buche de noel recipe below!
Buche de Noel
Cake recipe from Rose Levy Beranbaum's The Cake Bible
1/4 cup (50 grams) plus 2 tablespoons (28 grams) granulated white sugar
6 large eggs, separated
1/2 teaspoon pure vanilla extract
4 ounces (112 grams) bittersweet or semisweet chocolate, chopped in small pieces
3/4 teaspoon cream of tartar
Preheat oven to 350 degrees F (180 degrees C) and place the oven rack in the center of the oven. Butter, or spray with a non stick vegetable spray, a 17 x 12 inch (43x30 cm) baking pan. Line the pan with parchment paper and then butter and flour the parchment paper.
While the eggs are still cold, separate the eggs, placing the whites in one bowl and the yolks in another. Cover and bring to room temperature before using (about 30 minutes). Meanwhile melt the chocolate in a heatproof bowl placed over a saucepan of simmering water. Remove from heat and cool.
In the bowl of your electric mixer (or with a hand mixer) place the egg yolks and 1/4 cup of sugar and beat until light and fluffy (about five minutes). (When you slowly raise the beaters, the batter will fall back into the bowl in a slow ribbon.) Beat in the vanilla extract. Scrape down sides of bowl. Add the melted chocolate and beat only to combine.
In a clean mixing bowl, with the whisk attachment, beat the egg whites until foamy. Add the cream of tartar and beat at medium-high speed until soft peaks form. Gradually beat in the remaining 2 tablespoons sugar until stiff peaks form.
Gently fold a small amount of the egg whites into the egg yolk mixture using a rubber spatula or whisk. Fold in the remaining whites just until incorporated. Don't over mix or the batter will deflate. Spread the batter evenly into the prepared pan. Bake until the cake is puffed, has lost its shine, and springs back when gently pressed, about 15-17 minutes. Remove from oven and place on wire rack to cool. Cover the cake with a clean, slightly damp towel.
Whipped Cream
1 cup heavy whipping cream
1/4 cup granulated sugar
1 tsp vanilla
1/2 tsp cinnamon
Beat together all ingredients until the cream starts to hold firm peaks, but don't beat so long that it starts to curdle and have a buttery, overwhipped texture.
Ganache
12 oz good-quality semi-sweet chocolate
1.5 cups heavy cream
2 tbsp softened butter
Chop the chocolate into small pieces and place it in a large bowl. Add the butter on top. Put the cream in a saucepan over medium-high heat and heat until it simmers and bubbles appear along the sides of the pan, but do not bring it to a boil.
Pour the hot cream over the chopped chocolate and whisk it together until the chocolate melts and the mixture is shiny and smooth.
Cover with cling wrap and, ideally, let sit overnight at room temperature to firm up until it is a spoonable consistency, like peanut butter. If you don't have that much time, place it in the refrigerator and whisk it every 15 minutes until it is the texture of frosting. Do not leave it in the fridge too long, or it will get hard!
Meringue Mushrooms
Try my recipe here, or there's also a photo tutorial. Easy, yay!
Buche de Noel Assembly
Once the cake has cooled, spread it with an even layer of the whipped cream. Gently roll the cake, peeling off the parchment paper as you roll (the cake may crack).
Trim one end of the cake at an angle and set it aside. Then place the cake, seam side down, on your serving platter lined with strips of waxed paper. Take the slice of reserved cake and attach it to the top of the cake to resemble a branch growing off the log.
Gently spread the ganache over the outside of the cake. Once it's completely covered, use a spatula or a fork to create waves and texture in the ganache to resemble tree bark.
Finish the buche de noel with meringue mushrooms, powdered sugar or coconut for snow, and optional accents like leaves or chocolate shavings.
Saturday, March 13, 2010
Milk Chocolate Cremeux with Coconut Sorbet
This may sound odd coming from a sugarphile, but I don't usually order dessert when eating out. I eat so many sweets at work and at home as it is, I feel like it has to be really worth it for me to spend my dining-out calories on more dessert.
But when the husband and I were having lunch at Fraiche in Santa Monica this past week, I abandoned my anti-dessert stance and suggested we split a dessert. (By the way, lunch was fantastic and Friache is highly recommended to any fellow Angelenos.) Inspired partially by coconut month, we decided to order the Milk Chocolate Cremeux with Coconut Sorbet, Browned Butter Ganache and Candied Pecans.
The dessert was so good, I forgave the snooty waitress for smirkily correcting my pronunciation of "cremeux." Apparently the proper pronunciation is crque-mruouuouo.
I also forgave her for saying "That was fast!" with more than a touch of condescension when she came to clear away our plates. I wanted to say, "Listen lady, I had to share this weensy square of crque-mruouuouo with a man affectionately known around my house as "the ravenous ravenous rhino," whose arms are twice the length of mine and who possesses an uncanny knack for asking a question just to get me talking while he shovels in as much dessert as he possibly can in the 5-10 seconds I spend answering it. The speed of my eating this dessert is not greed so much as a legitimate concern for self, thank you." Instead, my snark was mellowed by a belly full of dessert, so I simply said "It was great!" in a fake chirpy voice.
I liked this dessert so much, I decided to recreate it when I got home. The basic elements were: the milk chocolate cremeux, a creamy mousse-like dessert with perhaps a bit more body than your standard mousse. What was special about it was that it really didn't seem sweet at all--it had a smooth chocolate flavor but none of the cloying sweetness of so many milk chocolate desserts. The coconut sorbet brought the sweetness with a smooth, light texture. I substituted candied walnuts for pecans (what I had on hand) and created a crispy chocolate topping to go with it--Fraiche's version had slivered chocolate that added some texture and crunch. I omitted the browned butter ganache, which looked like sad spaghetti strands on the plate and which didn't add much to the dish for my taste.
Success! We thought the recreation tasted very similar to the original, and it reminded us of how awesome this dessert was in the first place. The best part is that everything was really easy to make. The cremeux comes together in about 15 minutes, then just requires a little freezing until it is firm enough to cut and plate. The sorbet is a no-cook recipe that needs a few minutes in an ice cream maker to freeze, and the toppings are literally 5 minutes each. I had it all made and photographed in the space of a morning.
This experience also reminded me how useful it can be to order dessert out sometimes--it gives me new ideas, exposes me to new recipes and flavor combinations, and just recharges the creative batteries. And now we have a great new recipe for our next dinner party--no snooty waitstaff required.
Read on for the recipes!
Chocolate Cremeux
Yields 4-8 servings, depending on size
3/4 tsp powdered gelatin (or 1 gelatin sheet)
159 g milk (I used 1%)
102 g milk chocolate, chopped
24 g dark chocolate (70%), chopped
38 g egg yolks (about 2 large)
15 g granulated sugar, divided use
127 g heavy cream
good pinch of salt
Place 1 tbsp cold water in a very small bowl, and sprinkle the gelatin on top. Set aside to bloom while you continue preparing the recipe.
In a large, heat-proof bowl, combine the milk chocolate and dark chocolate. In a separate bowl, whisk together the egg yolks and half of the sugar.
In a small saucepan, bring the milk, cream, salt, and remaining sugar to a simmer. As it comes to a simmer, place the gelatin bowl in the microwave and heat for about 15 seconds, just until the gelatin liquefies.
Temper the hot milk into the egg yolks: slowly drizzle a little hot liquid into the yolks, whisking constantly, until about half of the hot liquid has been incorporated. Pour the tempered egg mixture back into the saucepan and return it to the heat. Cook, stirring constantly, until the mixture reaches 182 F.
Remove from the heat and quickly whisk in the liquid gelatin. Pour the hot mixture over the chopped chocolate, and gently stir until the chocolate is melted and smooth. Do not whisk too vigorously, or you'll create air bubbles.
Pour the cremeux into your desired molds: bowls, glasses, ring molds, or one large pan to cut later. If you want to use a large pan, I suggest lining it with parchment or foil so you can pull it out later and cut cleanly. Refrigerate to set the cremeux. If you'll be cutting it, place it in the freezer until it is firm enough to cut and handle cleanly.
Coconut Sorbet
2 (14.5 oz) cans coconut milk
1 cup granulated sugar
Whisk together the coconut milk and sugar until the sugar is completely dissolved. Chill well, then freeze in an ice cream maker according to manufacturer's directions. You can also add a cup or two of shredded coconut if you want to add some texture.
Crispy Chocolate Topping
45 grams dark chocolate, chopped
45 grams milk chocolate, chopped
50 grams praline paste (optional, adds great flavor)
50 grams cereal (like rice crispies or cornflakes. I used Honey Bunches of Oats!)
10 grams cacao nibs
Melt the chocolates together in the microwave, then mix in the praline paste. Gently stir in the cereal and the cacao nibs. Spread the mixture in a thin layer on a foil-covered baking sheet and refrigerate to set the chocolate, about 20 minutes. Once set, remove from the baking sheet and chop very finely with a large knife. This is also a great ice cream topping.
Candied Walnuts
1/2 cup granulated sugar
1/2 cup toasted walnuts
Sprinkle sugar evenly on a large saucepan over medium-high heat. Allow sugar to melt without stirring, swirling the pan occasionally once it starts to melt to help the sugar melt evenly. Once entirely melted, it will start to color quickly. I like to let it get a good amount of color--a decent golden brown--before adding the walnuts. Once added, stir until they're entirely coated with the sugar and cook for a few more minutes, until toasty brown and fragrant. Pour onto a silpat or foil-lined baking sheet spray with nonstick spray. While warm, separate the nuts from each other and from any pooled caramel. Once cool, coarsely chop.
Sunday, December 28, 2008
Christmas with the Daring Bakers: French Yule Log
Given the timing, it wasn't a surprise that this month's Daring Bakers challenge was a Yule Log, or Buche de Noel. It also wasn't a surprise that this was the most time-intensive, complicated Yule Log I've ever made. Most yule logs that I've seen are comprised of a thin sponge cake rolled around a mousse or buttercream filling, and frosted with chocolate to resemble tree bark. This yule log, on the other hand, was composed of six different elements, from cake to mousse to creme brulee, layered in a buche mold or loaf pan, and frozen until solid.
The craziness first started with the question of the cake mold. You see, I wanted a rounded yule log. I knew that I could make my buche in a square-cornered loaf pan, but as we all know, there are no square-cornered logs found in nature. My baker's OCD demanded fully realistic edible flora! However, my obsessiveness is rivaled only by my cheapness, and I decided I didn't want to spend $40 on a buche cake pan, so I decided to construct one myself. Hello, second grade!

However, a mold made from reinforced posterboard and duct tape worked swimmingly. I was worried about it softening after being filled and frozen, but it had no problems keeping its shape. It is now in my closet, because I spent too long making it to throw it away, even though I can't imagine needing it again. This is how pack rats think, people.

So after all the drama with the mold was over, all that was left was making the six buche components and assembling it over the course of several days! Simplicity itself. Here's what the buche was composed of:

I wanted a chocolate yule log, because chocolate makes everything better, but I wanted to fancy it up a little bit, so I added a few extra flavors. The chocolate mousse got a little orange zest to add a citrus flavor, the ganache got a bunch of cayenne and a little cinnamon to add some spice, and the creme brulee was infused with a cinnamon stick, although that flavor got lost in the heavier chocolate flavors. I made my own praline and thought the hazelnut praline crisp layers were the best part. So flaky, so crunchy, so delicious! Call me, hazelnut praline.
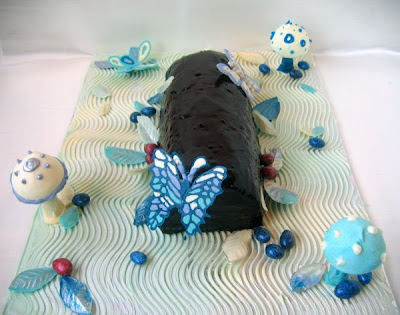
I had a grand vision of creating a frosty winter wonderland scene for my yule log, so I created a bunch of chocolate mushrooms, leaves, and butterflies, and set it all on a foil-covered cake board covered with multicolored chocolate designs. In the end it wasn't as glorious as my dream--perhaps I should have continued the second grade crafts theme and made a diorama--but I did have fun fiddling with all of my accessories. Here are some close-ups:
The butterflies: I drew a few different butterfly templates onto a sheet of paper and taped waxed paper over it. I traced the designs using different colored candy melts, and once they were hard, glued them together with more candy melts. It was definitely a learning process, and next time I know to make my butterflies a bit thicker so they don't keep breaking.The mushrooms: For the caps, I inflated balloons just the tiniest bit, and dipped them halfway into candy melts. I set them to dry upside-down in an egg carton, and once completely dry, popped the balloon and carefully peeled it away. The stems were thin cigarette cookies dipped in candy melts and glued to the caps with candy melts.
The leaves: These were my favorite! Simply paint the tops of leaves with candy melts. You can use one color or blend several colors on one leaf. Once dry, carefully peel the leaf away, and you have a pretty chocolate leaf! I painted some of my butterflies and leaves with silver luster dust to get them to glitter.
The berries and rocks: these are new M&Ms Premiums. The red ones are raspberry almond and the blue ones are plain almond. They taste all right, but I mostly love them for their appearance.
The cake board: was made by covering a cardboard base with aluminum foil. I took several colors of candy melts--white and light blues--and plopped them at random intervals on the cake board. Then I smoothed them into a very thin layer with an offset spatula, and dragged a serrated cake comb through it to give an interesting design.
Overall, this recipe was time-consuming, between creating all the different elements and the various cooling/chilling times before assembly, but I didn't have too many difficulties or frustrations. I did have a bit of a hard time with the pate a bombe for the mousse, because the quantities were so small in my mixer. While I was making the icing I tasted it and thought it was seriously bitter, so I added a lot of extra sugar to compensate. I also doubled the icing recipe because so many people had difficulty getting it to fully cover their logs. Other than that, it was smooth sailing! I need to give a special shout-out to my main dishes man, who washed every dish in our kitchen--thrice, it seems--during the course of making this dessert.
And how did it taste? Darn good! All of the elements worked extremely well together, and although it seems excessive, the taste is actually quite light and not too rich. It also keeps incredibly well--I made it 2 weeks ago and froze it, and we're now enjoying it--straight from the refrigerator, not the freezer--over this Christmas weekend. Everyone who's tried it has liked it immensely, so I will consider this a success.Because it was so much work, it probably won't be a regular dessert, but I will definitely keep the recipe one hand next time I need a show-stopper. The exceedingly long recipe is below, under the cut.
What did everyone else think?
This month's challenge is brought to us by the adventurous Hilda from Saffron and Blueberry and Marion from Il en Faut Peu Pour Etre Heureux.
They have chosen a French Yule Log by Flore from Florilege Gourmand.
Dacquoise Biscuit (Almond Cake)
Preparation time: 10 mn + 15 mn for baking
Equipment: 2 mixing bowls, hand or stand mixer with whisk attachment, spatula, baking pan such as a 10”x15” jelly-roll pan, parchment paper
Note: You can use the Dacquoise for the bottom of your Yule Log only, or as bottom and top layers, or if using a Yule log mold (half-pipe) to line your entire mold with the biscuit. Take care to spread the Dacquoise accordingly. Try to bake the Dacquoise the same day you assemble the log to keep it as moist as possible.
Ingredients:
2.8 oz (3/4cup + 1Tbsp / 80g) almond meal
1.75 oz (1/2 cup / 50g) confectioner’s sugar
2Tbsp (15g) all-purpose flour
3.5oz (100g / ~100ml) about 3 medium egg whites
1.75 oz (4 Tbsp / 50g) granulated sugar
1. Finely mix the almond meal and the confectioner's sugar. (If you have a mixer, you can use it by pulsing the ingredients together for no longer than 30 seconds).
2. Sift the flour into the mix.
3. Beat the eggs whites, gradually adding the granulated sugar until stiff.
4. Pour the almond meal mixture into the egg whites and blend delicately with a spatula.
5. Grease a piece of parchment paper and line your baking pan with it.
6. Spread the batter on a piece of parchment paper to an area slightly larger than your desired shape (circle, long strip etc...) and to a height of 1/3 inches (8mm).
7. Bake at 350°F (180°C) for approximately 15 minutes (depends on your oven), until golden.
8. Let cool and cut to the desired shape.
Dark Chocolate Mousse
Preparation time: 20mn
Equipment: stand or hand mixer with whisk attachment, thermometer, double boiler or equivalent, spatula
Note: You will see that a Pate a Bombe is mentioned in this recipe. A Pate a Bombe is a term used for egg yolks beaten with a sugar syrup, then aerated. It is the base used for many mousse and buttercream recipes. It makes mousses and buttercreams more stable, particularly if they are to be frozen, so that they do not melt as quickly or collapse under the weight of heavier items such as the crème brulee insert.
Ingredients:
2.5 sheets gelatin or 5g / 1 + 1/4 tsp powdered gelatin
1.5 oz (3 Tbsp / 40g) granulated sugar
1 ½ tsp (10g) glucose or thick corn syrup
0.5 oz (15g) water
50g egg yolks (about 3 medium)
6.2 oz (175g) dark chocolate, coarsely chopped
1.5 cups (350g) heavy cream (35% fat content)
[I added the zest of one orange to make orange-chocolate mousse]
1. Soften the gelatin in cold water. (If using powdered gelatin, follow the directions on the package.)
2. Make a Pate a Bombe: Beat the egg yolks until very light in colour (approximately 5 minutes until almost white).
2a. Cook the sugar, glucose syrup and water on medium heat for approximately 3 minutes (if you have a candy thermometer, the mixture should reach 244°F (118°C). If you do not have a candy thermometer, test the sugar temperature by dipping the tip of a knife into the syrup then into a bowl of ice water, if it forms a soft ball in the water then you have reached the correct temperature.
2b. Add the sugar syrup to the beaten yolks carefully by pouring it into the mixture in a thin stream while continuing to beat the yolks. You can do this by hand but it’s easier to do this with an electric mixer.
2c. Continue beating until cool (approximately 5 minutes). The batter should become thick and foamy.
3. In a double boiler or equivalent, heat 2 tablespoons (30g) of cream to boiling. Add the chopped chocolate and stir until melted and smooth.
4. Whip the remainder of the cream until stiff.
5. Pour the melted chocolate over the softened gelatin, mixing well. Let the gelatin and chocolate cool slightly and then stir in ½ cup (100g) of WHIPPED cream to temper. Add the Pate a Bombe.
6. Add in the rest of the WHIPPED cream (220g) mixing gently with a spatula.
Dark Chocolate Ganache Insert
Preparation time: 10mn
Equipment: pan, whisk. If you have plunging mixer (a vertical hand mixer used to make soups and other liquids), it comes in handy.
Note: Because the ganache hardens as it cools, you should make it right before you intend to use it to facilitate piping it onto the log during assembly. Please be careful when caramelizing the sugar and then adding the cream. It may splatter and boil.
Ingredients:
1.75 oz (4 Tbsp / 50g) granulated sugar
4.5oz (2/3 cup – 1 Tbsp/ 135g) heavy cream (35% fat content)
5 oz (135g) dark chocolate, finely chopped
3Tbsp + 1/2tsp (45g) unsalted butter softened
[I added a hefty shake of cayenne to make it spicy]
1. Make a caramel: Using the dry method, melt the sugar by spreading it in an even layer in a small saucepan with high sides. Heat over medium-high heat, watching it carefully as the sugar begins to melt. Never stir the mixture. As the sugar starts to melt, swirl the pan occasionally to allow the sugar to melt evenly. Cook to dark amber color (for most of you that means darker than last month’s challenge).
2. While the sugar is melting, heat the cream until boiling. Pour cream into the caramel and stir thoroughly. Be very careful as it may splatter and boil.
3. Pour the hot caramel-milk mixture over the dark chocolate. Wait 30 seconds and stir until smooth.
4. Add the softened butter and whip hard and fast (if you have a plunging mixer use it). The chocolate should be smooth and shiny.
Praline Feuillete (Crisp) Insert
Preparation time: 10 mn (+ optional 15mn if you make lace crepes)
Equipment: Small saucepan, baking sheet (if you make lace crepes).
Double boiler (or one small saucepan in another), wax paper, rolling pin (or I use an empty bottle of olive oil).
Note: Feuillete means layered (as in with leaves) so a Praline Feuillete is a Praline version of a delicate crisp. There are non-praline variations below. The crunch in this crisp comes from an ingredient which is called gavottes in French. Gavottes are lace-thin crepes. To our knowledge they are not available outside of France, so you have the option of making your own using the recipe below or you can simply substitute rice krispies or corn flakes or Special K for them. Special note: If you use one of the substitutes for the gavottes, you should halve the quantity stated, as in use 1oz of any of these cereals instead of 2.1oz.
Ingredients for the Praline Feuillete:
3.5 oz (100g) milk chocolate
1 2/3 Tbsp (25g) butter
2 Tbsp (1 oz / 30g) praline
2.1oz (60g) lace crepes(gavottes) or rice krispies or corn flakes or Special K
1. Melt the chocolate and butter in a double boiler.
2. Add the praline and the coarsely crushed lace crepes. Mix quickly to thoroughly coat with the chocolate.
3. Spread between two sheets of wax paper to a size slightly larger than your desired shape. Refrigerate until hard.
Vanilla Crème Brulée Insert
Preparation time: 15mn + 1h infusing + 1h baking
Equipment: Small saucepan, mixing bowl, baking mold, wax paper
Ingredients:
1/2 cup (115g) heavy cream (35% fat content)
½ cup (115g) whole milk
4 medium-sized (72g) egg yolks
0.75 oz (2 Tbsp / 25g) granulated sugar
1 vanilla bean
[I added a cinnamon stick to make cinnamon creme brulee]
1. Heat the milk, cream, and scraped vanilla bean to just boiling. Remove from the stove and let the vanilla infuse for about 1 hour.
2. Whisk together the sugar and egg yolks (but do not beat until white).
3. Pour the vanilla-infused milk over the sugar/yolk mixture. Mix well.
4. Wipe with a very wet cloth and then cover your baking mold (whatever shape is going to fit on the inside of your Yule log/cake) with parchment paper. Pour the cream into the mold and bake at 210°F (100°C) for about 1 hour or until firm on the edges and slightly wobbly in the center.
5. Let cool and put in the freezer for at least 1 hour to firm up and facilitate the final assembly.
Dark Chocolate Icing
Preparation time: 25 minutes (10mn if you don’t count softening the gelatin)
Equipment: Small bowl, small saucepan
Note: Because the icing gelifies quickly, you should make it at the last minute.
Ingredients:
4g / ½ Tbsp powdered gelatin or 2 sheets gelatin
¼ cup (60g) heavy cream (35 % fat content)
2.1 oz (5 Tbsp / 60g) granulated sugar [I almost doubled this--it was bitter as written!]
¼ cup (50g) water
1/3 cup (30g) unsweetened cocoa powder
[I doubled the recipe to make pouring easier]
1. Soften the gelatin in cold water for 15 minutes.
2. Boil the rest of the ingredients and cook an additional 3 minutes after boiling.
3. Add gelatin to the chocolate mixture. Mix well.
4. Let cool while checking the texture regularly. As soon as the mixture is smooth and coats a spoon well (it is starting to gelify), use immediately.
Yule Log Assembly
Depending on whether your mold is going to hold the assembly upside down until you unmold it or right side up, this order will be different.
THIS IS FOR UNMOLDING FROM UPSIDE DOWN TO RIGHT SIDE UP.
You will want to tap your mold gently on the countertop after each time you pipe mousse in to get rid of any air bubbles.
1) Line your mold or pan, whatever its shape, with rhodoid (clear hard plastic, I usually use transparencies cut to the desired shape, it’s easier to find than cellulose acetate which is what rhodoid translates to in English) OR plastic film. Rhodoid will give you a smoother shape but you may have a hard time using it depending on the kind of mold you’re using.
You have two choices for Step 2, you can either have Dacquoise on the top and bottom of your log as in version A or you can have Dacquoise simply on the bottom of your log as in version B:
2A) Cut the Dacquoise into a shape fitting your mold and set it in there. If you are using an actual Yule mold which is in the shape of a half-pipe, you want the Dacquoise to cover the entire half-pipe portion of the mold.
3A) Pipe one third of the Mousse component on the Dacquoise.
4A) Take the Creme Brulee Insert out of the freezer at the last minute and set on top of the mousse. Press down gently to slightly ensconce it in the mousse.
5A) Pipe second third of the Mousse component around and on top of the Creme Brulee Insert.
6A) Cut the Praline/Crisp Insert to a size slightly smaller than your mold so that it can be surrounded by mousse. Lay it on top of the mousse you just piped into the mold.
7A) Pipe the last third of the Mousse component on top of the Praline Insert.
8A) Freeze for a few hours to set. Take out of the freezer.
9A) Pipe the Ganache Insert onto the frozen mousse leaving a slight eidge so that ganache doesn’t seep out when you set the Dacquoise on top.
10A) Close with the last strip of Dacquoise.
Freeze until the next day.
OR
2B) Pipe one third of the Mousse component into the mold.
3B) Take the Creme Brulee Insert out of the freezer at the last minute and set on top of the mousse. Press down gently to slightly ensconce it in the mousse.
4B) Pipe second third of the Mousse component around and on top of the Creme Brulee Insert.
5B) Cut the Praline/Crisp Insert to a size slightly smaller than your mold so that it can be surrounded by mousse. Lay it on top of the mousse you just piped into the mold.
6B) Pipe the last third of the Mousse component on top of the Praline Insert.
7B) Freeze for a few hours to set. Take out of the freezer.
8B) Pipe the Ganache Insert onto the frozen mousse leaving a slight edge so that ganache doesn’t seep out when you set the Dacquoise on top.
9B) Close with the Dacquoise.
Freeze until the next day.
If you are doing the assembly UPSIDE DOWN with TWO pieces of Dacquoise the order is:
1) Dacquoise
2) Mousse
3) Creme Brulee Insert
4) Mousse
5) Praline/Crisp Insert
6) Mousse
7) Ganache Insert
8) Dacquoise
THE NEXT DAY...
Unmold the cake/log/whatever and set on a wire rack over a shallow pan.
Cover the cake with the icing.
Let set. Return to the freezer.
You may decorate your cake however you wish. The decorations can be set in the icing after it sets but before you return the cake to the freezer or you may attach them on top using extra ganache or leftover mousse, etc...
Transfer to the refrigerator no longer than ½ hour before serving as it may start to melt quickly depending on the elements you chose.

Sunday, October 19, 2008
Take Your Blog to Work Day
I've been a little quiet lately because work has been hectic. This past weekend we had a 100-person wedding (tiered cake, groom's cake cupcakes, and mini cookie wedding favors) and a 300-person dessert catering event, in addition to our usual daily orders. And have I mentioned that we are currently a two-woman operation? Fortunately, we are more like two superwomen, so everything turned out well. But to apologize for the lack of posts, I have some pictures from work to tempt your taste buds.
The catering event was for a clothing company, hosted at an upscale department store. We did three mini desserts: chocolate-raspberry verrines, chocolate cupcake cones, and strawberry shortcakes. The verrines were layers of cream cheese mousse, chocolate mousse, and raspberry jam, served in a glass the size of a shot glass, and topped with a bit of champagne-pop rocks chocolate. (Yes, really. And yes, it's as gross as it sounds, and no, it was not our choice.)
Plated and ready to be passed:
Sure, they look adorable, until you realize that to serve 300 people, you have to make approximately a bajillion verinnes composed of a kablillion fiddly little layers, each layer carefully applied so that it's even and smooth, and each application requiring an extensive chilling period before the next layer could be added. I think I am done with verrines for a long, long time.
The cupcake cones were probably the most popular item. Miniature ice cream cones were filled with chocolate cake and topped with buttercream and sprinkles to resemble ice cream cones. They were a perfect two-bite dessert, and really appealed to both adults and children.
We had special trays constructed for passing, since they wouldn't balance on regular trays. The best part is, they can double as ping-pong paddles after the event!
This server graciously agreed to model for me to show the scale of the cones. He pretended reluctance, but he's probably an aspiring actor so I suspect he was secretly pleased. Also, notice the clothing racks in the back? That's because we were set up in, like, the alterations room of the store. You may be asking, is an alterations room equipped for catering? NO, no it is not. But who needs counters and running water and space when catering? Not us!
Strawberry shortcakes. Kind of awkward to pass, but it's what the client wanted. Homey desserts are big, and who can argue with fresh strawberries and cream?
This was the wedding cake. My boss actually made it, and while I would love to take credit for it, and under most circumstances I would, she might be reading this, so...hi boss! You do good work! *innocent whistling* This was taken before fresh flowers and other finishing touches were added.
Each layer was a different flavor. The bottom was vanilla sponge with vanilla buttercream and four types of fresh berries. The middle was chocolate cake with oreos, and the top was chocolate cake with caramel sauce and chopped Twix bars. It kind of makes me want to get married again, just for the cake!
These are the wedding favors. Each guest got a package of two miniature black and white cookies. I am beginning to suspect black and white cookies might be the next red velvet cupcakes. Mark my words: in a year we'll be surrounded by black and white cookie specialty shops, and all the cupcakeries will be out of business.
